Linux from Scratch
From Zero to Root: Your Journey Through Linux Commands

I'm a pre-final year computer Science and Design student.
What is Linux?
Linux is a free, open-source, Unix-like operating system kernel. It is the core software that manages a computer’s hardware resources, such as the CPU, memory, and devices. However, Linux is not just a single operating system—it’s a family of operating systems known as Linux distributions (or distros), which are built upon the Linux kernel and include a variety of software components to form a complete OS.
How Do We Interact with Linux?
In Linux, users can interact with the system in two primary ways:
GUI – Graphical User Interface
CLI – Command Line Interface
Graphical User Interface (GUI)
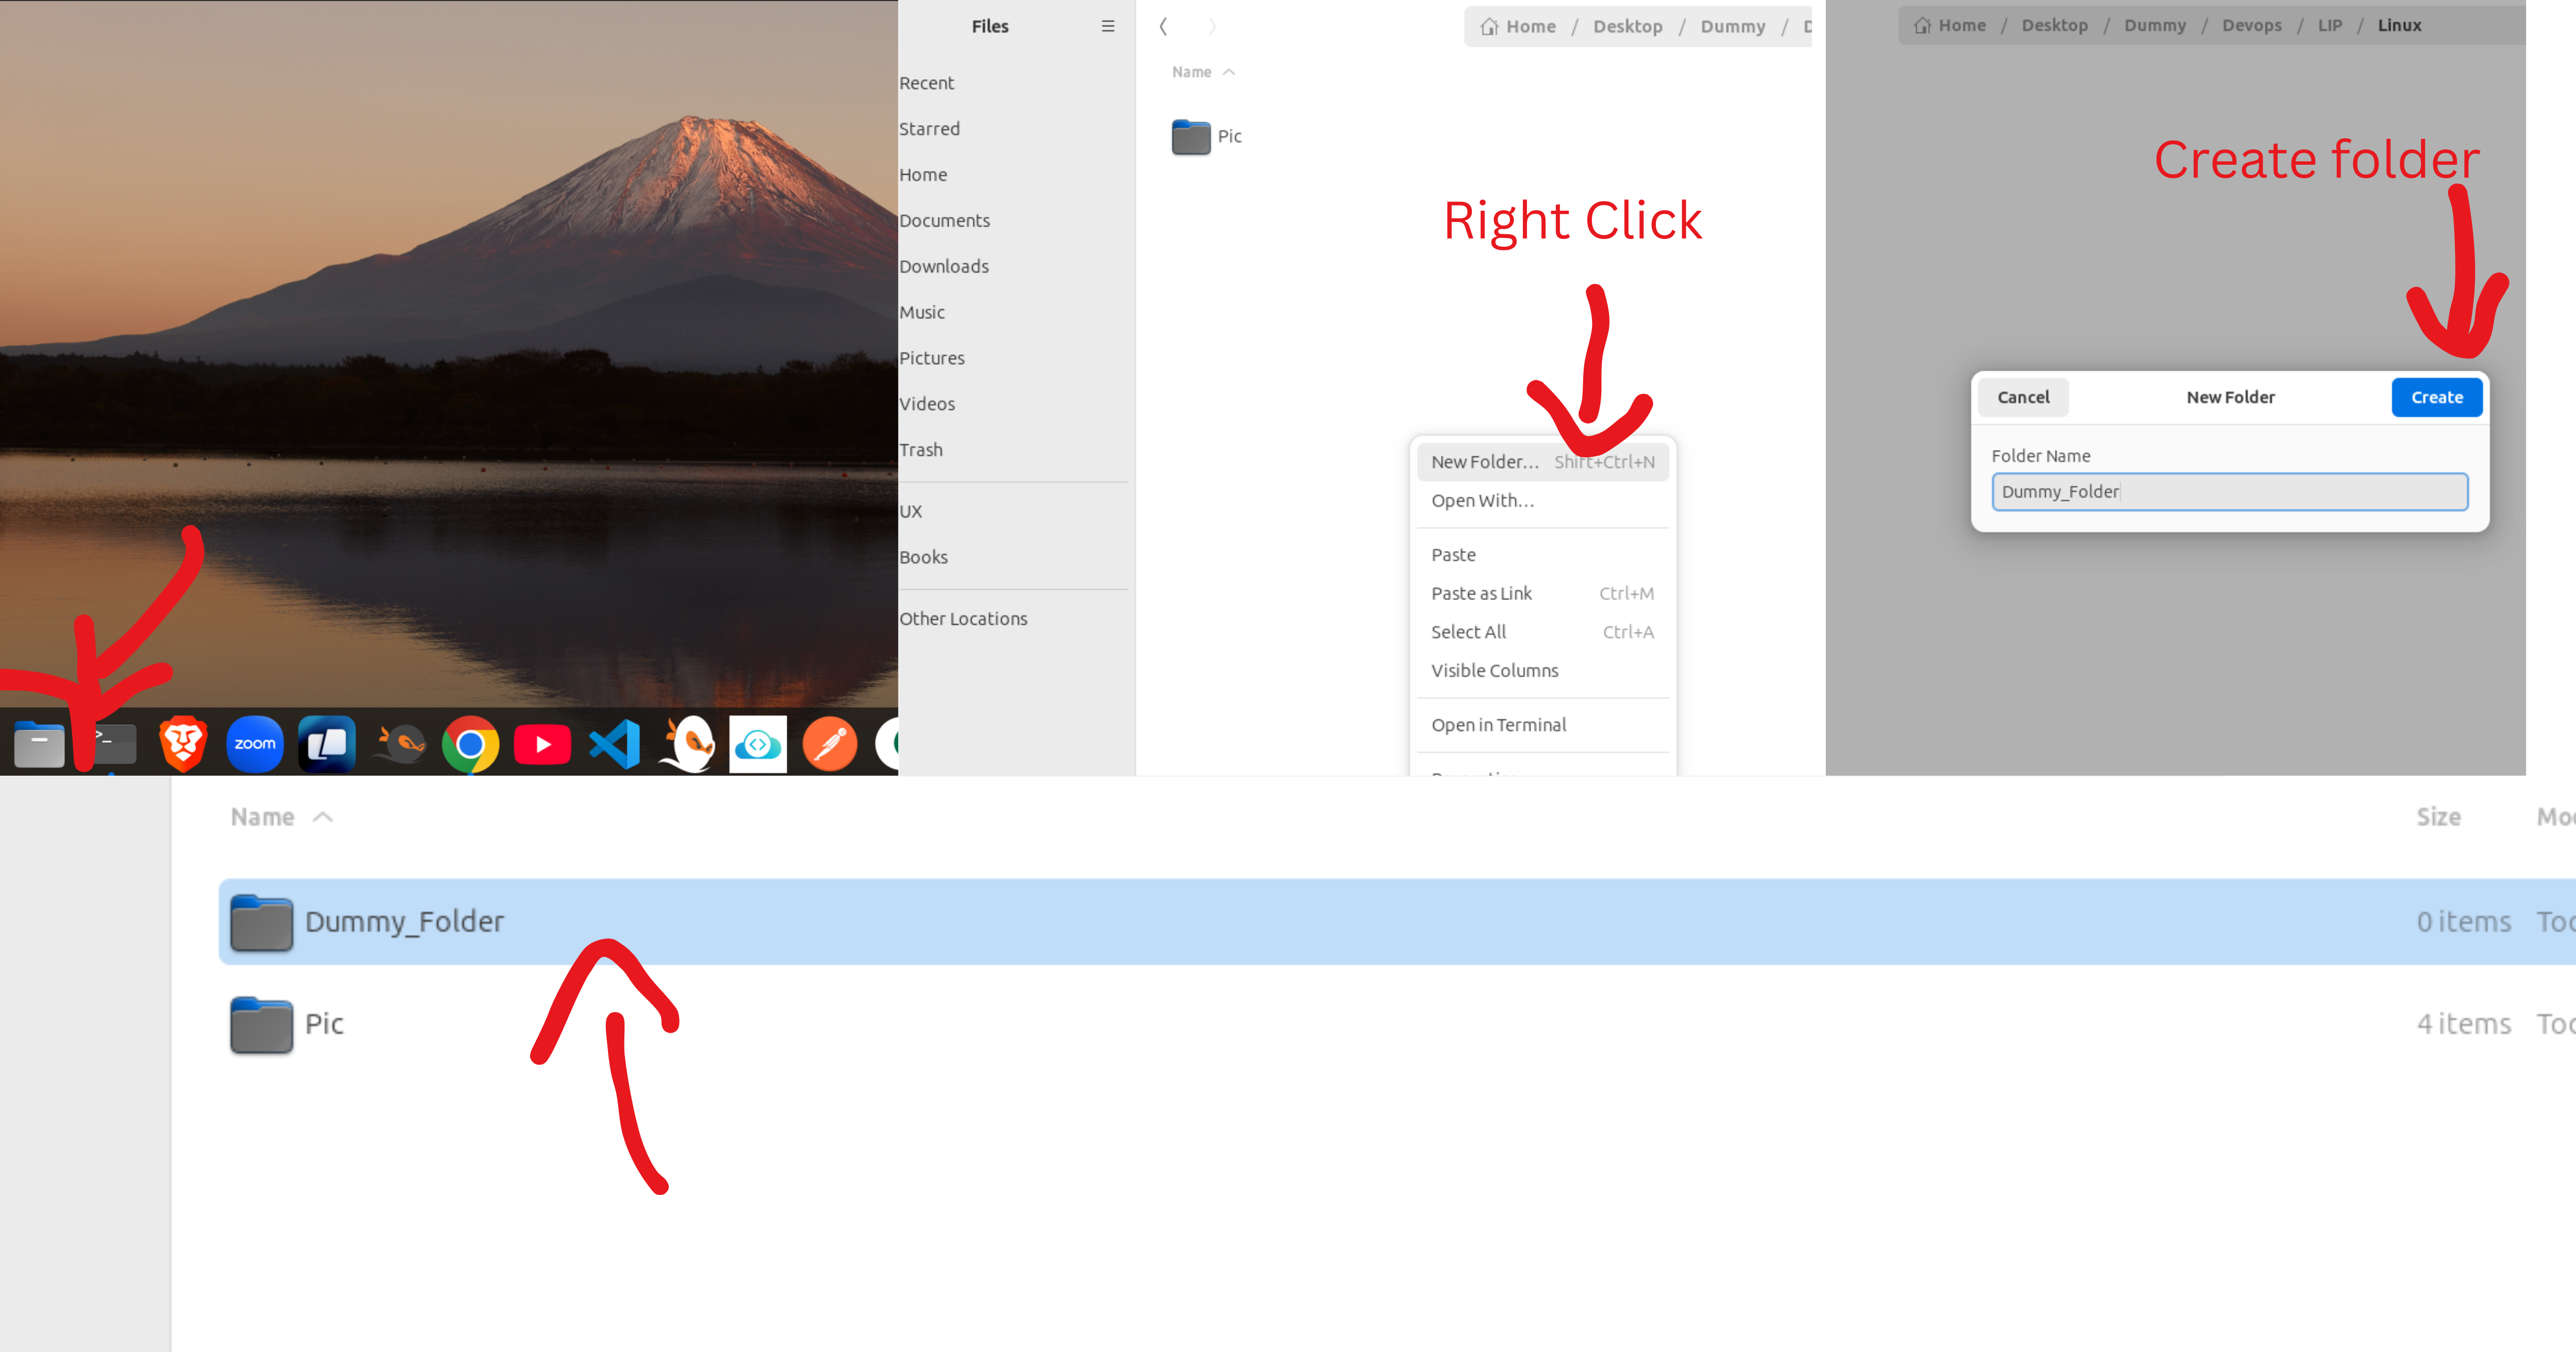
The GUI allows users to interact with the system visually, using windows, icons, and menus. Tasks like creating files or directories can be done with just a few clicks.
Example: Creating a Directory
As shown in the image above, you can easily create a directory using GUI tools like file managers. However, these actions can also be done using the Command Line Interface (CLI), which we will discuss next.
Command Line Interface (CLI)
The CLI lets users interact with the system by typing commands into a terminal. This method is often preferred by system administrators and power users because it provides greater control and flexibility.
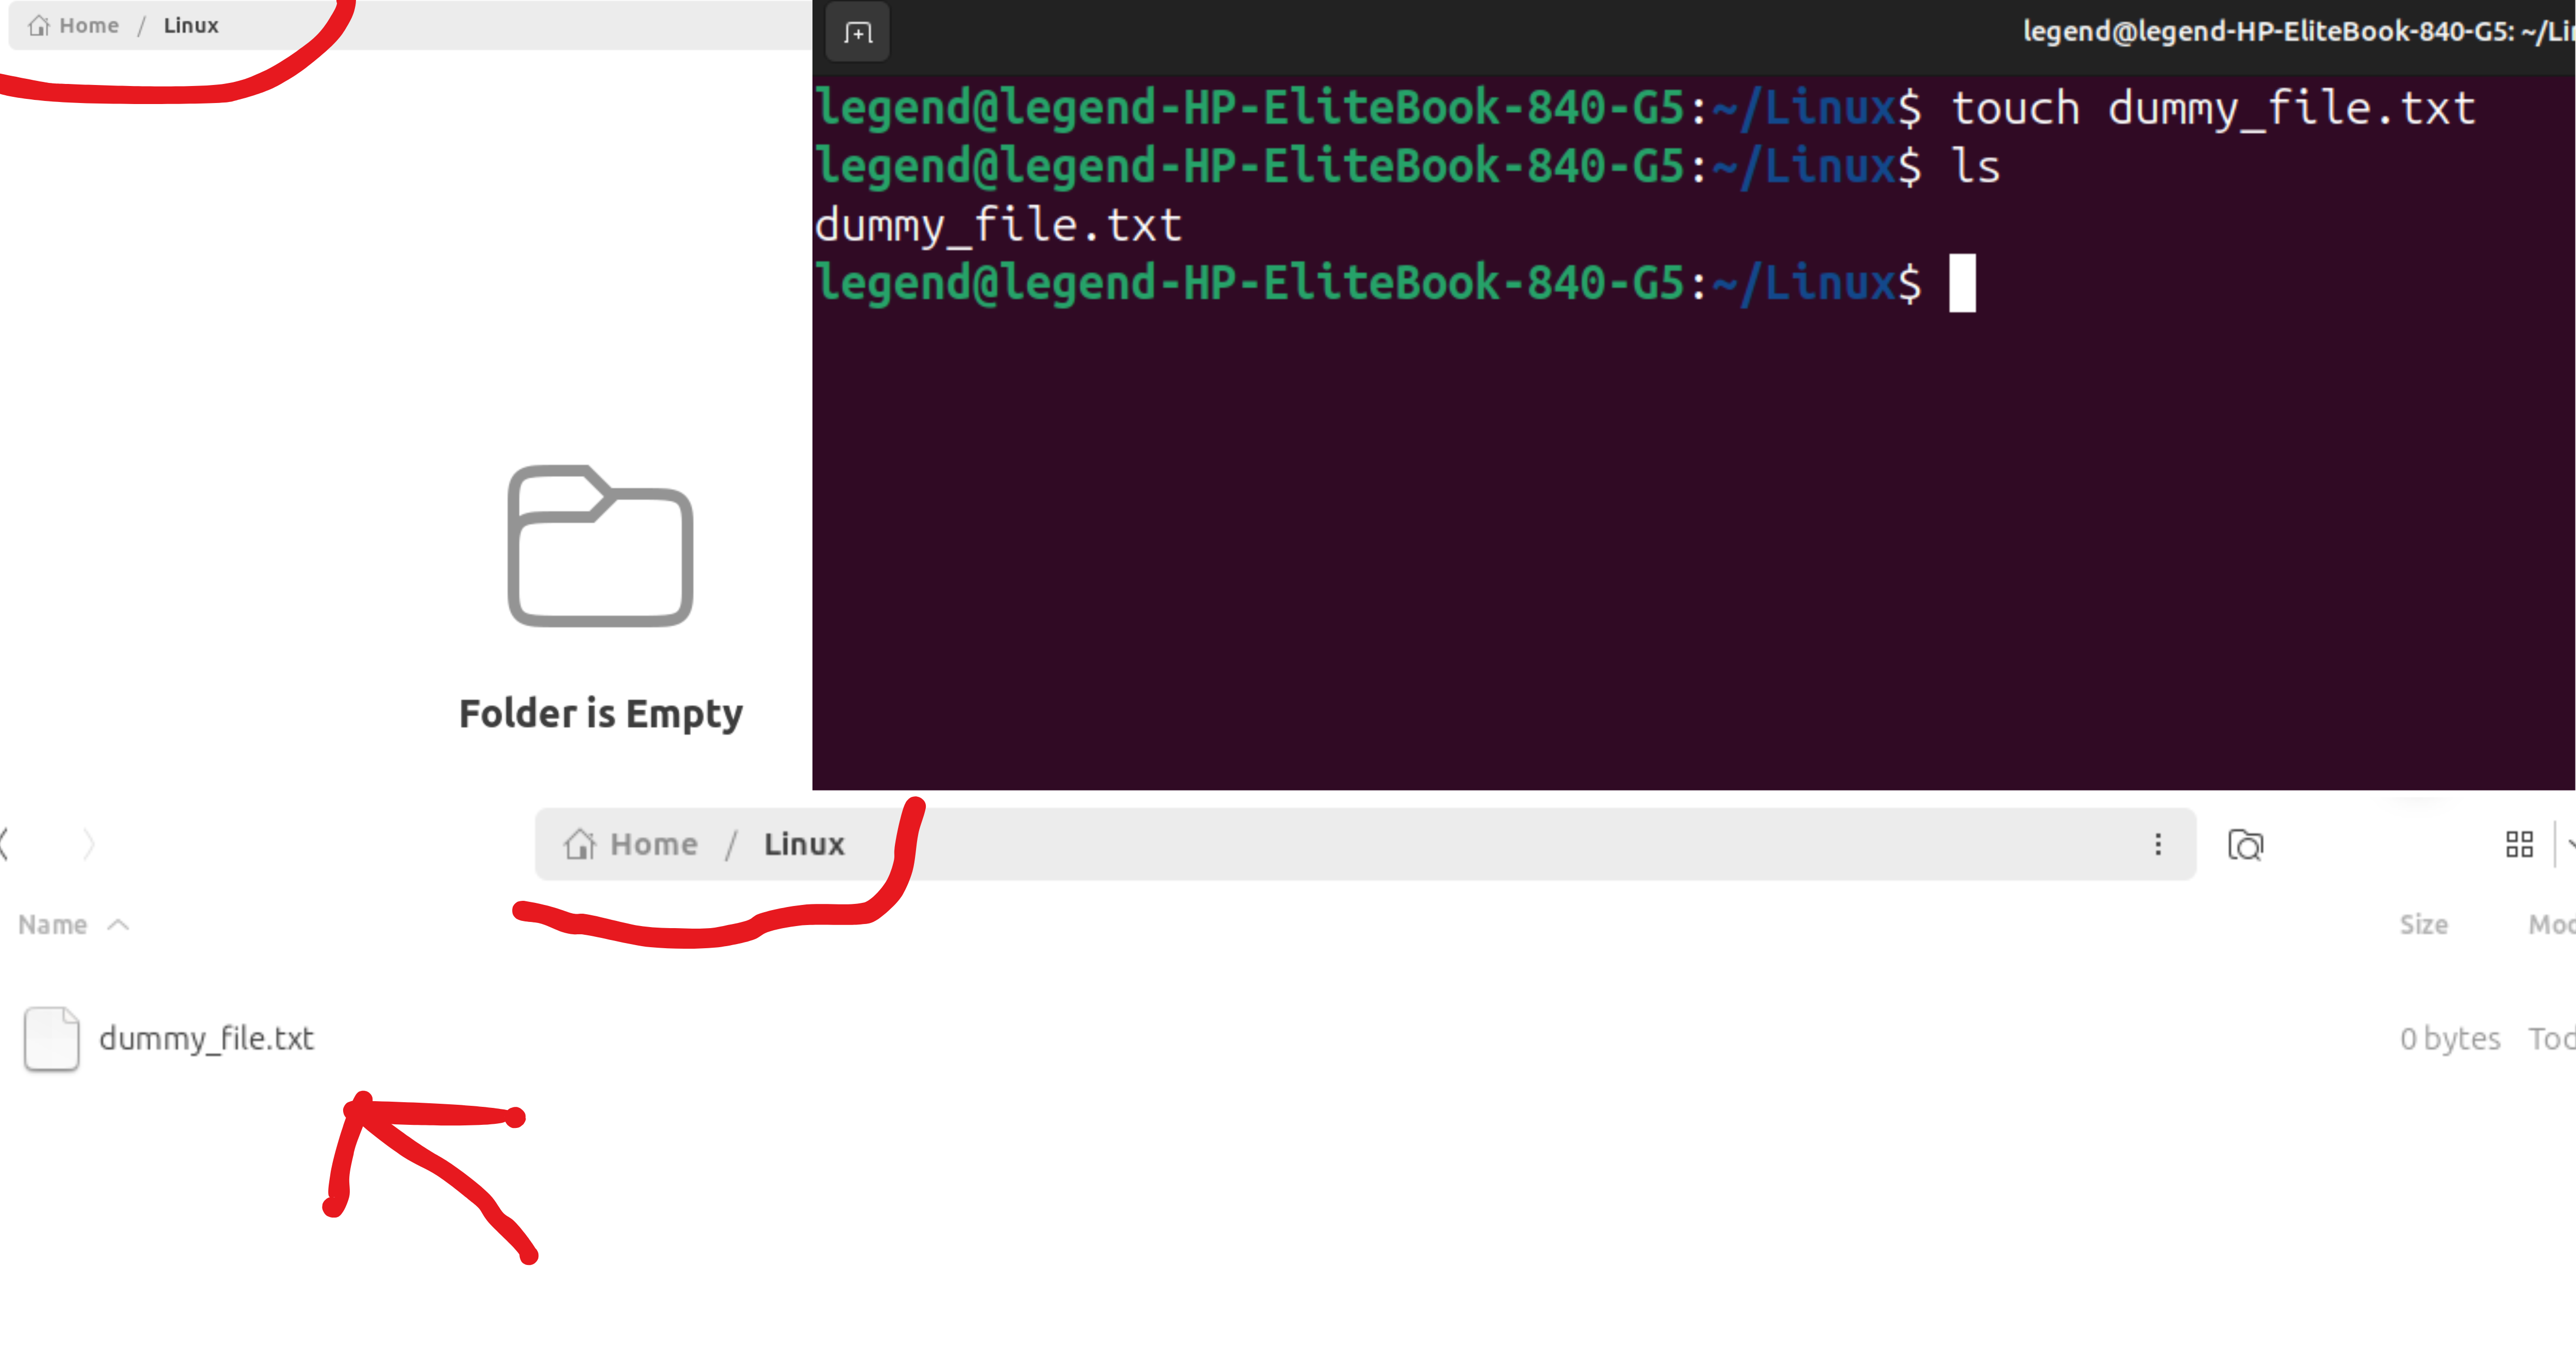
Example: Creating a File
In the image above, you can see that there is no file initially. By using the
touchcommand in the terminal, you can create a new file called dummy_file.txt. This file will then appear both in the GUI and when listing files in the terminal using thelscommand.
In-Depth Explanation
Linux Kernel: Think of the kernel as the brain of the OS. It handles communication between the software and the hardware. The Linux kernel is modular and constantly being updated by developers worldwide.
Linux Distributions: These are full operating systems based on the Linux kernel, bundled with various utilities and applications. Examples include Ubuntu, Fedora, Debian, and Arch Linux.
GUI vs CLI:
GUI is user-friendly and suitable for beginners. It’s similar to Windows or macOS environments where you click icons and use menus.
CLI is powerful and scriptable. It’s ideal for automating tasks, configuring systems, and managing servers.
What Is the Difference Between a Console and a Terminal/Terminal Emulator?
In the Linux world, you'll often come across the terms console and terminal. They might look similar, but there is a slight difference between them.
Console
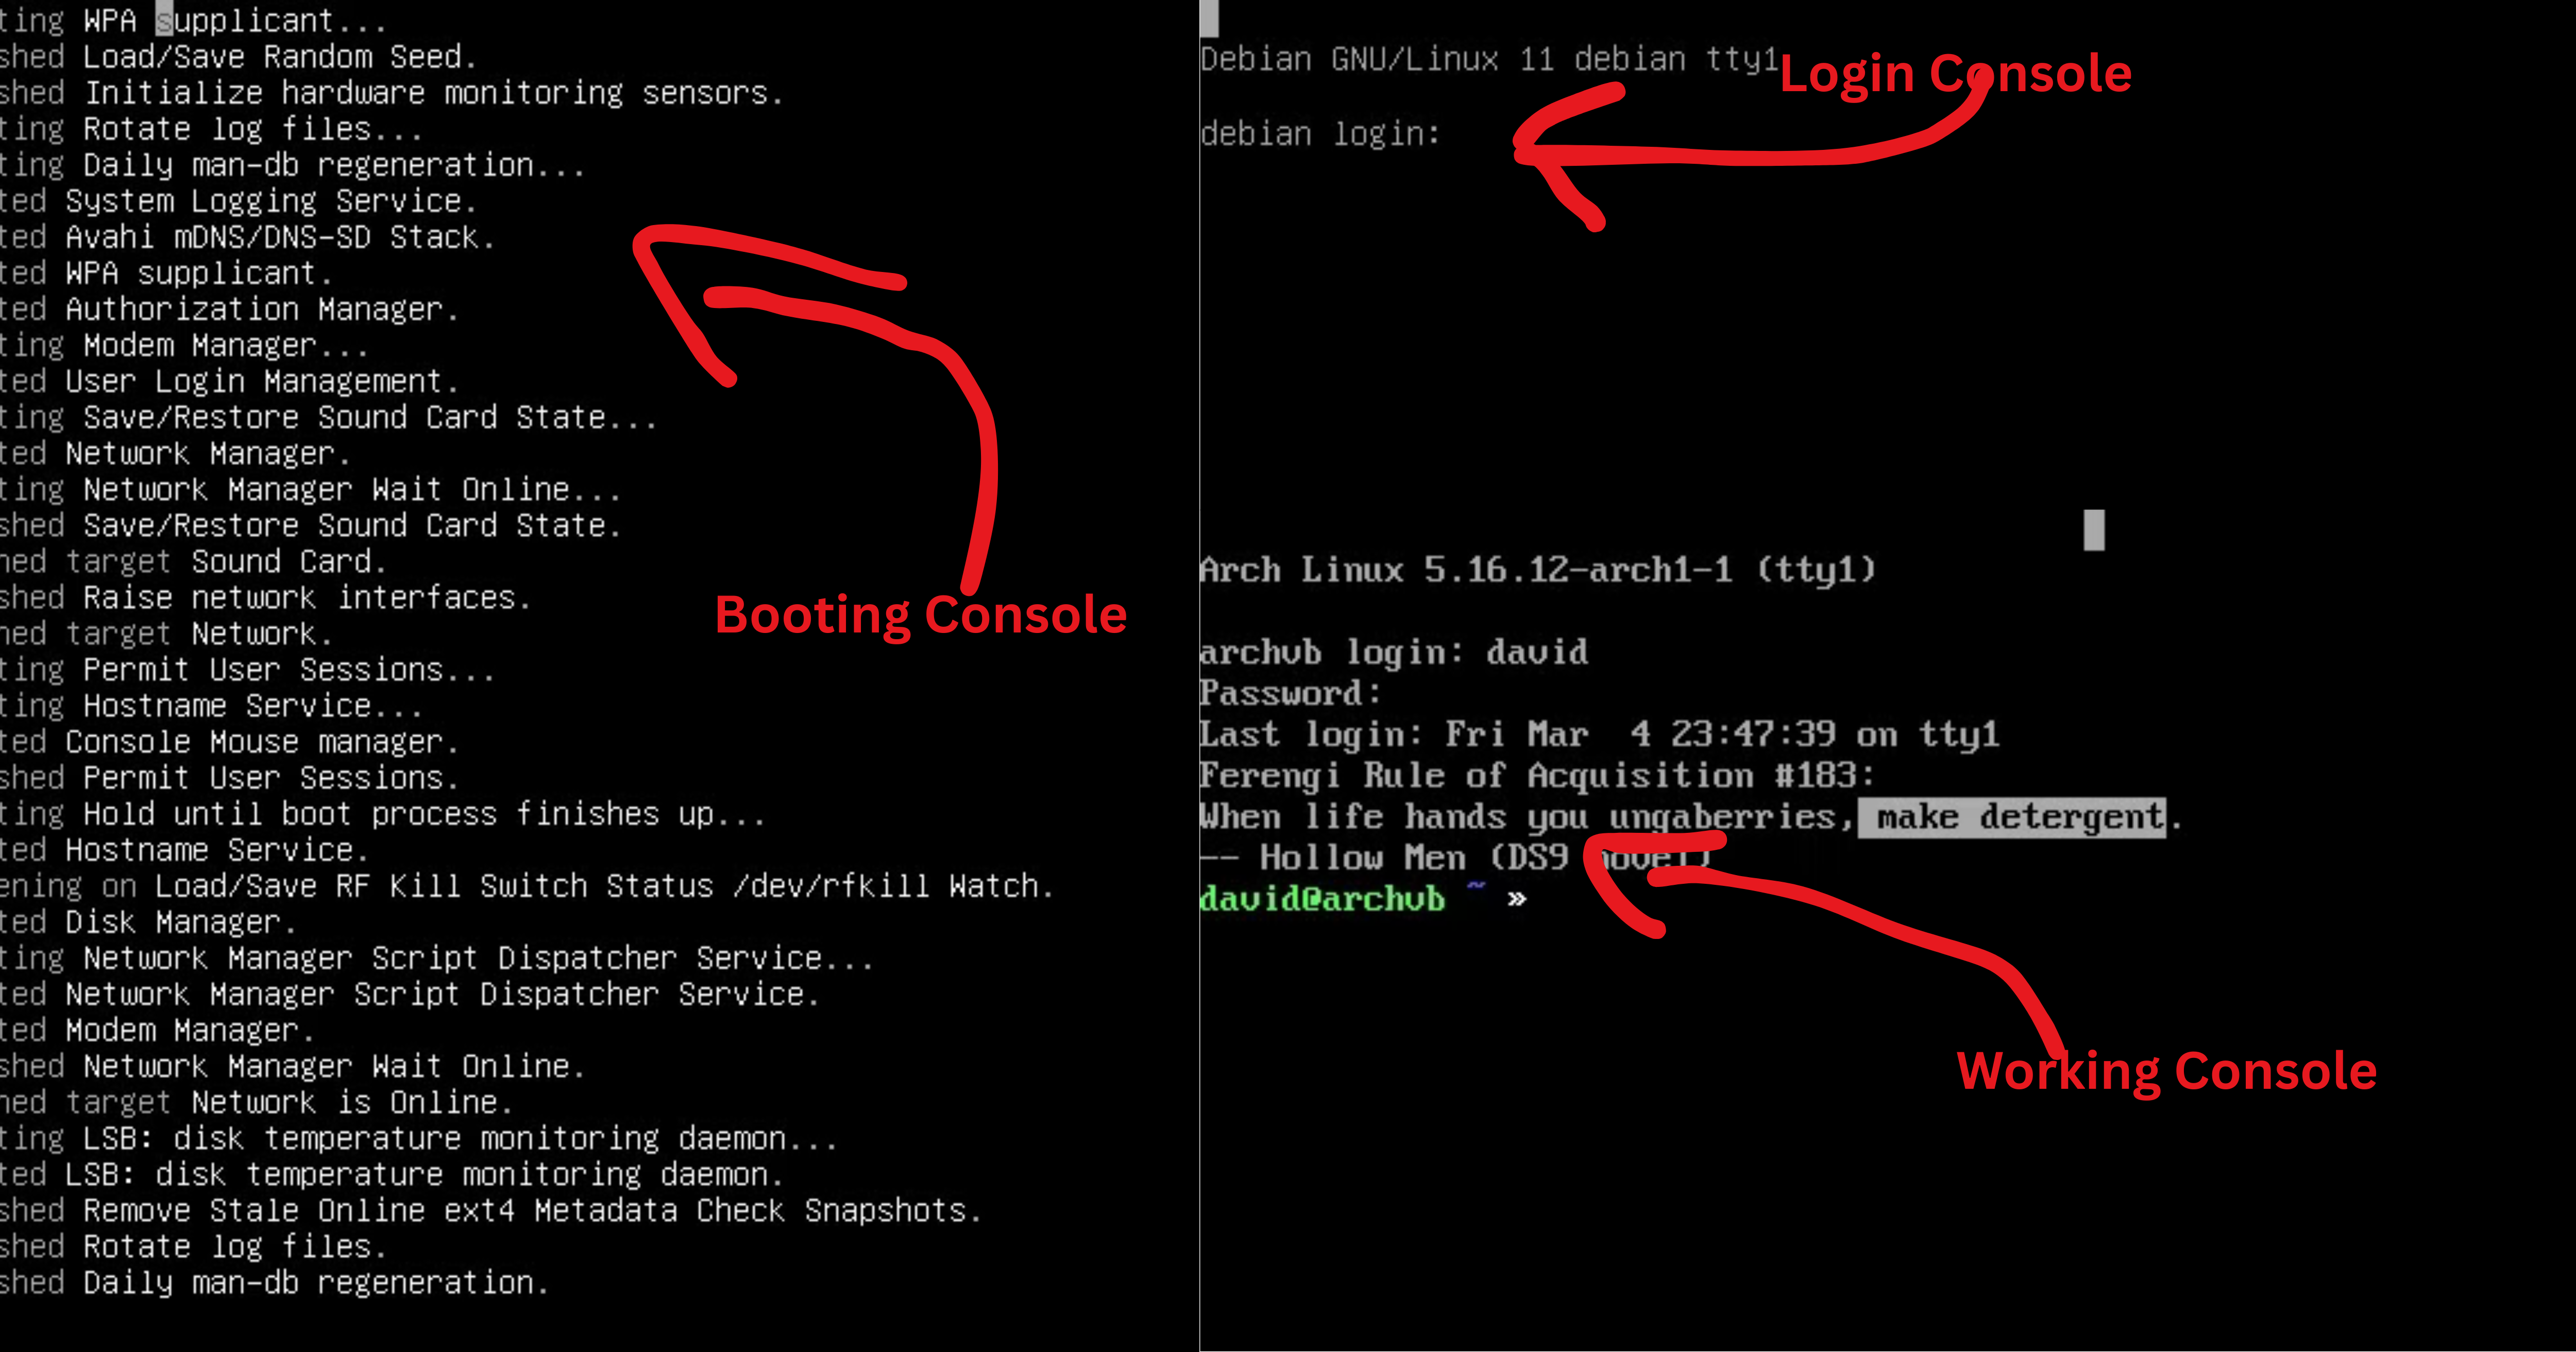
A console is a physical or virtual screen where the operating system displays text and allows users to log in or type commands. It's a lower-level interface directly connected to the system.
Example:
When your Linux system boots up, the screen that prompts for your username and password (before any desktop environment loads) is a console.
Terminal (or Terminal Emulator)
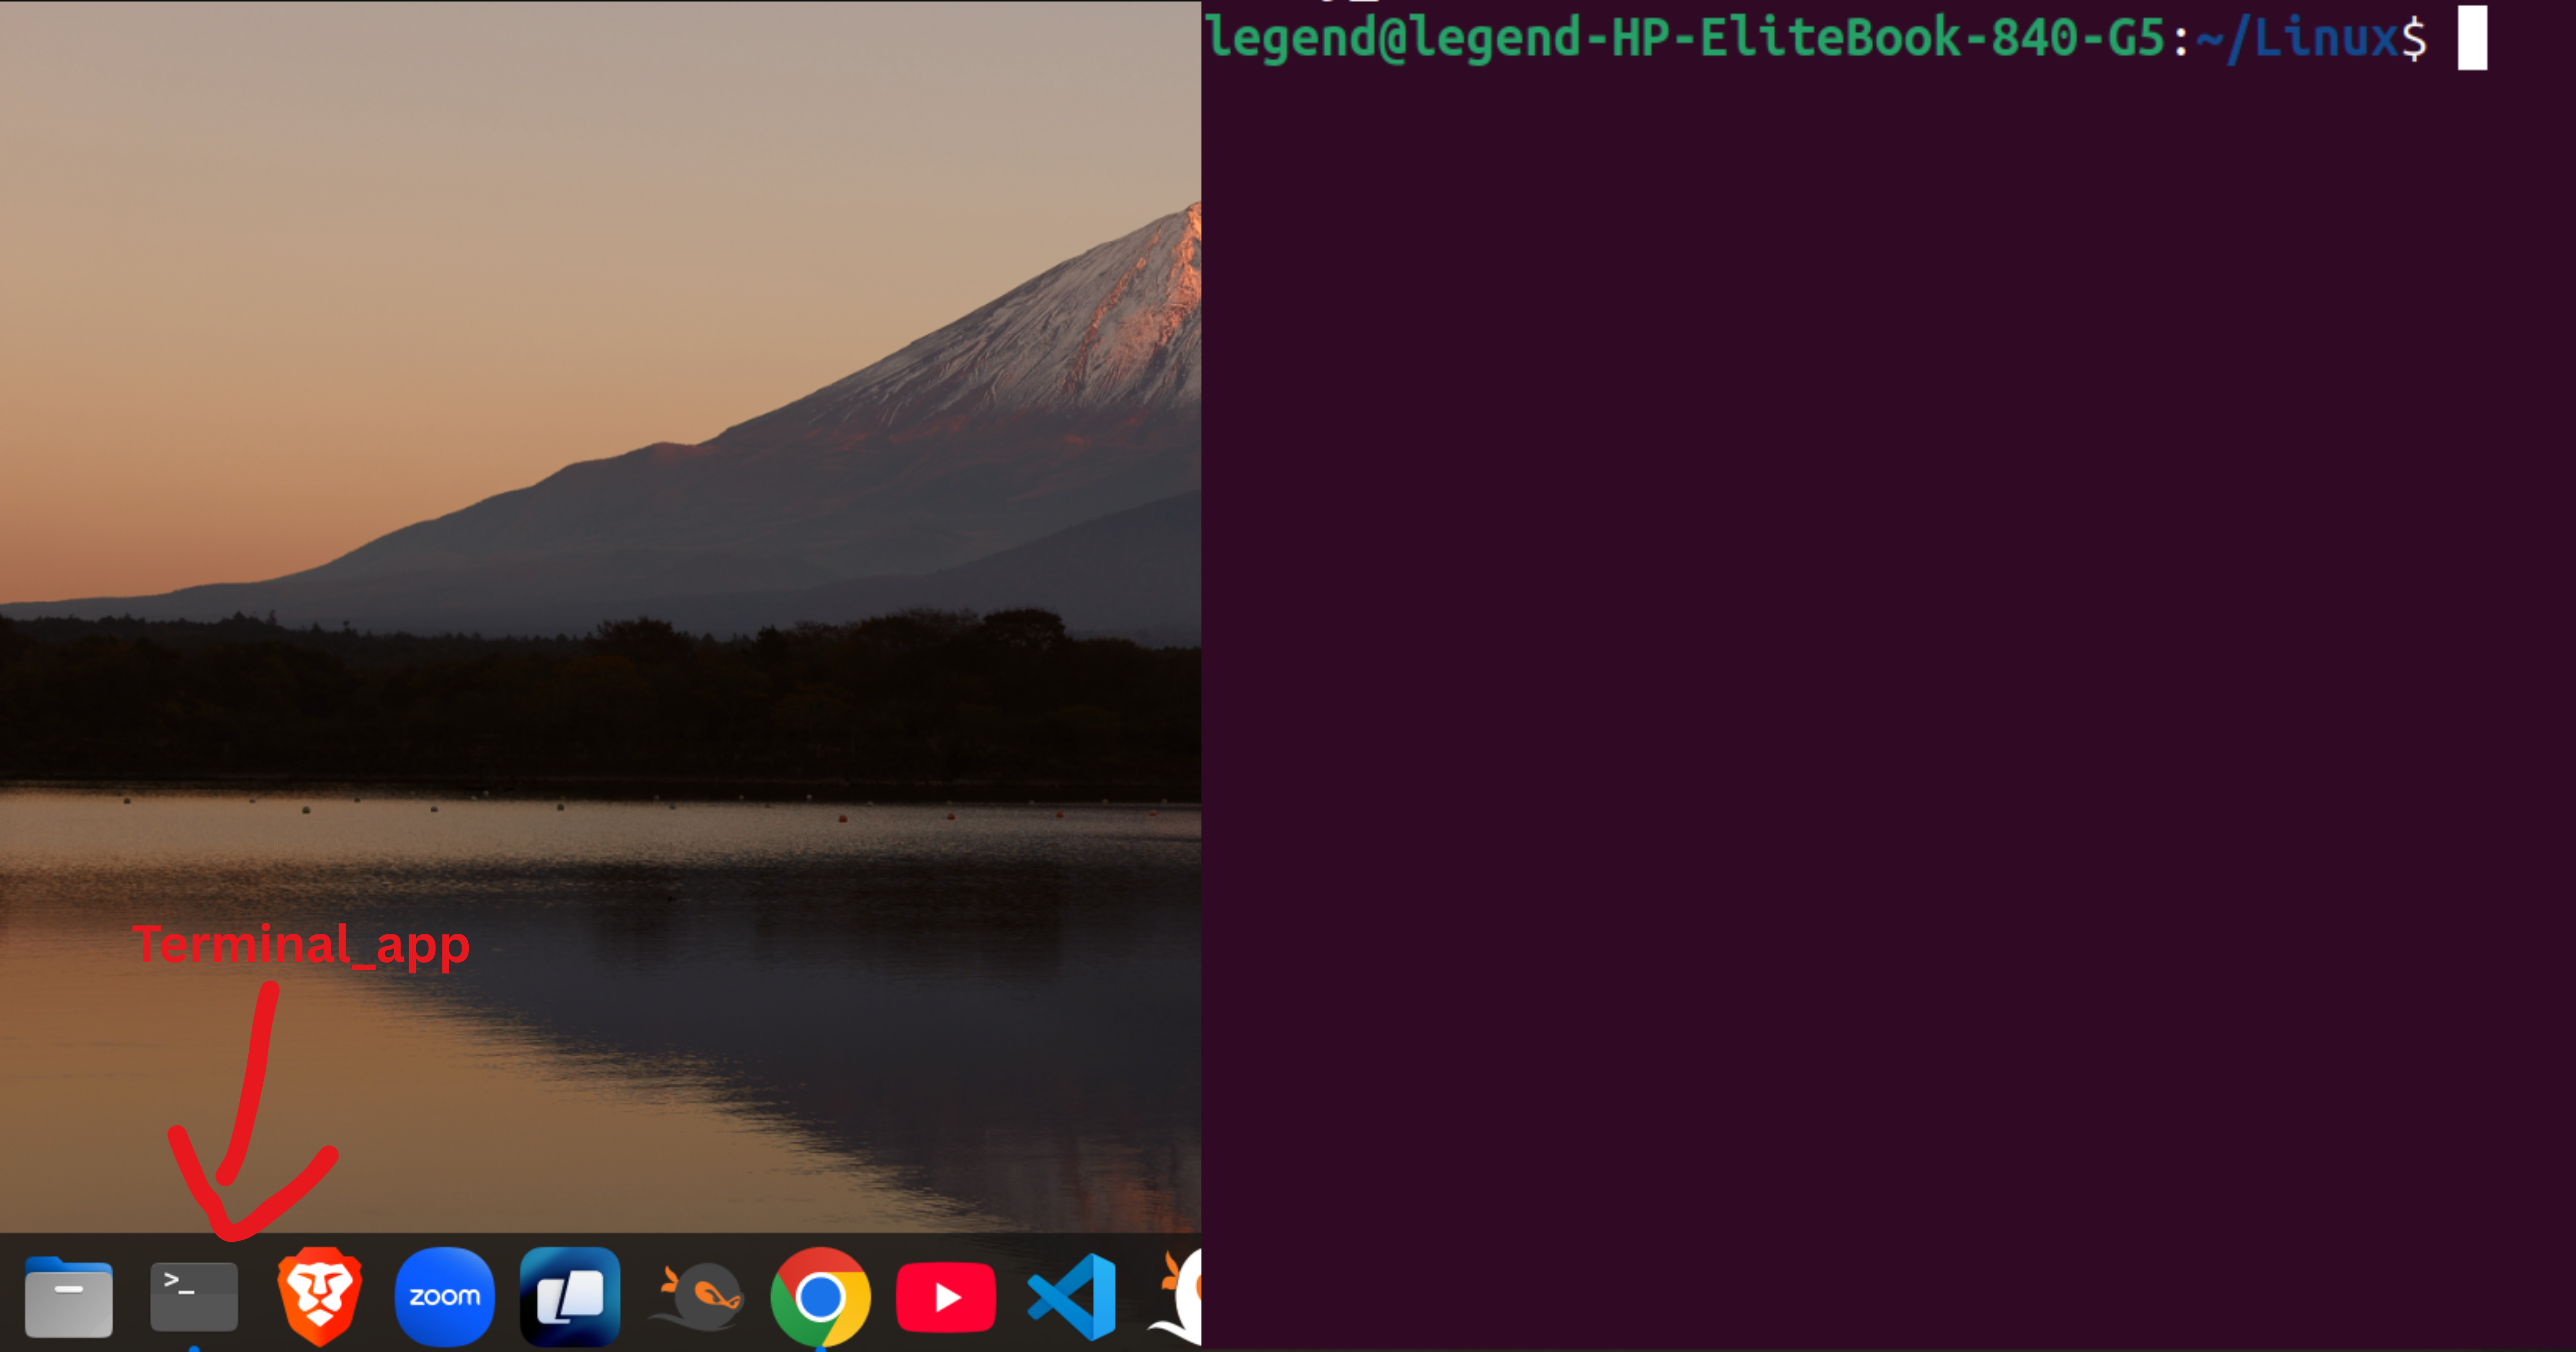
A terminal or terminal emulator is a graphical application that runs within a window in your desktop environment. It emulates a console and allows you to interact with the system by typing commands.
Example:
Applications like GNOME Terminal, Konsole, or xterm are terminal emulators. They look like black boxes where you type commands, but they are actually software programs running inside your graphical desktop.
Reading and Using System Documentation
Linux provides built-in documentation to help you understand and use commands efficiently. Two of the most commonly used documentation tools are:
1. --help Command
The --help flag can be added to most commands to get a quick overview of how they work.
Syntax:
<command-name> --help
Example:
mkdir --help
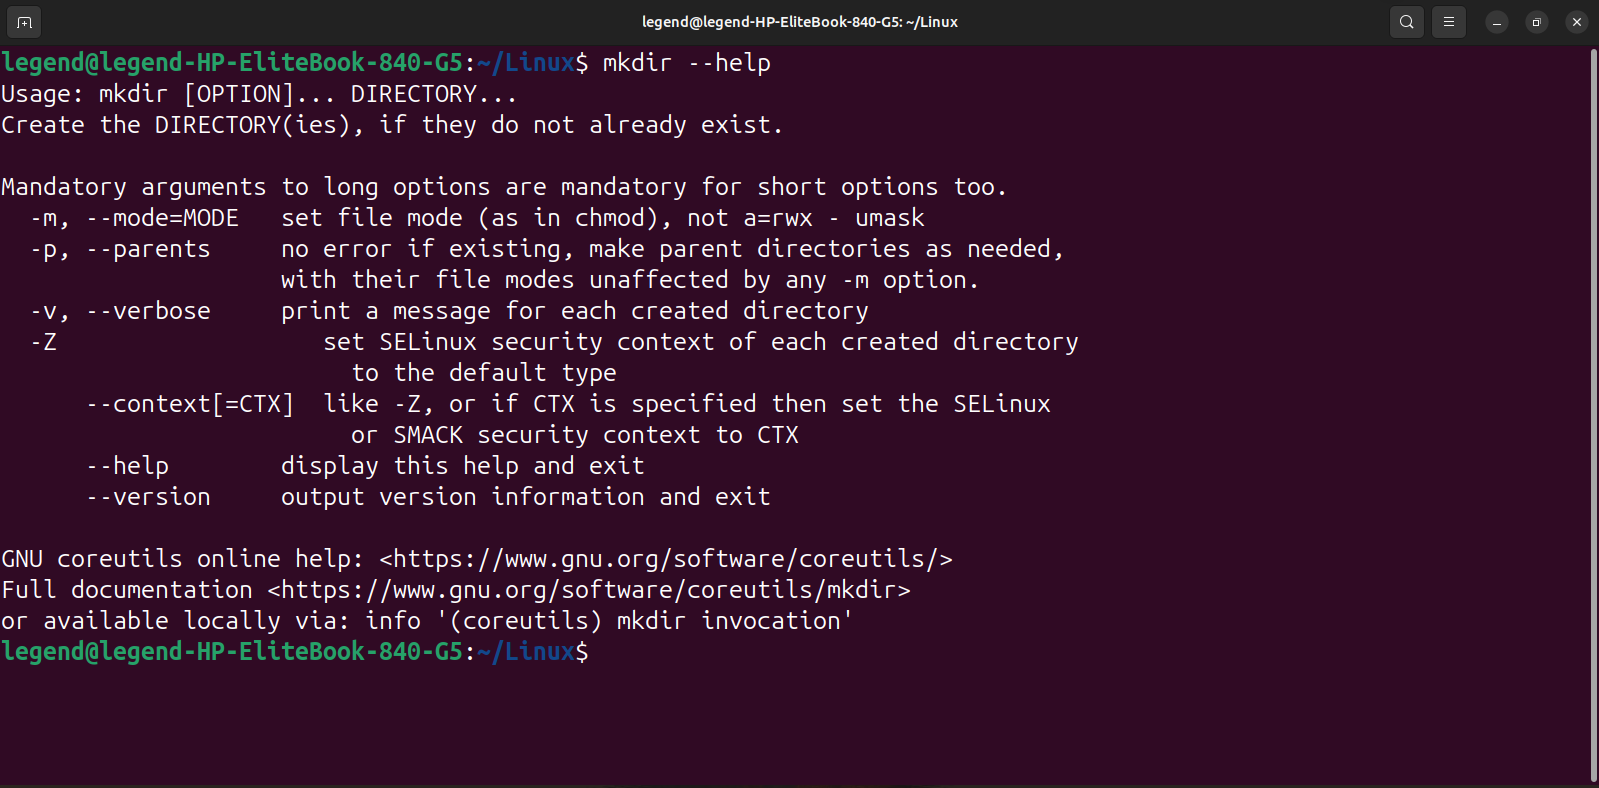
This will display help information about the mkdir command, including its usage, available flags, and examples.
2. man Command
The man command (short for manual) gives you access to detailed documentation for nearly every Linux command.
Syntax:
man <command-name>
Example:
man mkdir
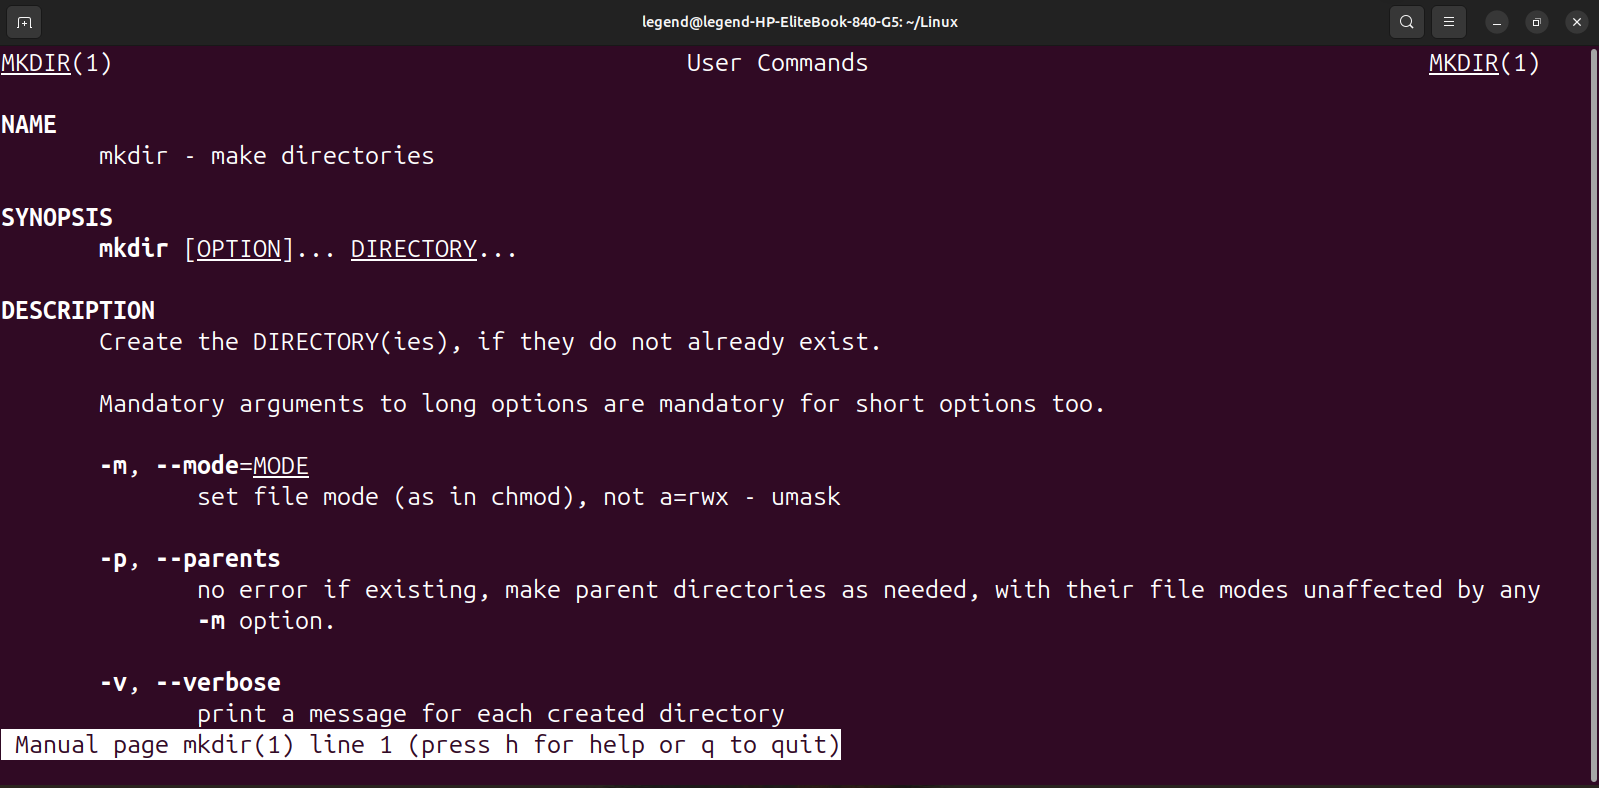
This opens the manual page for the mkdir command. Manual pages often include sections like NAME, SYNOPSIS, DESCRIPTION, OPTIONS, and EXAMPLES.
Autocomplete Using Tab Key in Linux
In the Linux terminal, you can use the Tab key to autocomplete commands, filenames, directories, and even options.
How it works:
Start typing a command or filename, then press
Tab.If it's unique, it will autocomplete it for you.
If there are multiple matches, press
Tabtwice to see the suggestions.
Examples:
cd Doc<Tab>   # Autocompletes to Documents (if the folder exists)
tou<Tab>      # Autocompletes to touch
This saves time and avoids spelling errors. It’s a powerful feature to boost your efficiency in the terminal.
What is the Linux Filesystem?
The Linux filesystem organises all files and directories under a single root directory (/). In Linux, everything is treated as a file, including documents, folders, and even hardware devices. To locate these files, we use paths, which can be absolute or relative.
1. Absolute Path
An absolute path starts from the root (/) and shows the complete location of a file or folder.
Example:
/home/username/Documents/file.txt
No matter where you are in the system, this path will always point to the same file.
2. Relative Path
A relative path starts from your current working directory and shows the location relative to it.
Example:
Documents/file.txt
This works only if you're already in
/home/username/.
Create, Delete, Copy, and Move Files and Directories in Linux
Managing files and directories is one of the most essential tasks when using Linux. Below is a clear explanation of how to create, delete, copy, and move them using the command line, followed by examples.
1. Viewing Files and Directories
To see what files and folders exist in your current directory, use the ls command:
Explanation:
ls– Lists files and folders in the current directory.ls -a– Shows hidden files as well (those starting with a dot.).ls -l– Displays detailed info like permissions, size, and date.ls -la– Combines-land-aoptions.ls -lah– Same as above, but shows sizes in KB, MB, etc.
Example:
ls         # Basic list
ls -a      # List all including hidden
ls -l      # List with details
ls -lah    # List with details and readable sizes
2. Check Current Location (Directory)
To find out which directory you’re currently in, use the pwd command.
Explanation:
pwdstands for Print Working Directory. It shows the full path of your current directory.
Example:
pwd
# Output: /home/username/Documents
3. Creating Files and Directories
You can create both files and directories from the terminal.
Explanation:
touch filename– Creates a new empty file.mkdir dirname– Creates a new directory (folder).
Example:
touch myfile.txt        # Creates a file named myfile.txt
mkdir myfolder          # Creates a directory named myfolder
4. Deleting Files and Directories
Use the rm command to remove files or directories.
Explanation:
rm filename– Deletes a file.rm -r dirname– Deletes a directory and all its contents.rm -rf dirname– Force delete a directory without confirmation.
Example:
rm myfile.txt           # Deletes the file
rm -r myfolder          # Deletes the folder and its contents
5. Copying Files and Directories
The cp command is used to copy files and directories.
Explanation:
cp source target– Copies a file.cp -r source_folder target_folder– Recursively copies an entire folder.
Example:
cp file1.txt file2.txt               # Copies file1.txt to file2.txt
cp -r myfolder/ backupfolder/        # Copies myfolder and everything in it
6. Moving or Renaming Files and Directories
The mv command moves or renames files and directories.
Explanation:
mv oldname newname– Renames a file or directory.mv file directory/– Moves the file into a different directory.
Example:
mv oldname.txt newname.txt          # Renames the file
mv file.txt myfolder/               # Moves file.txt into myfolder
mv folder1/ folder2/                # Renames folder1 to folder2
Links in Linux – Hard Link & Soft Link
In Linux, links are like shortcuts or references to files. They help you access the same file using different names or paths. There are two types of links:
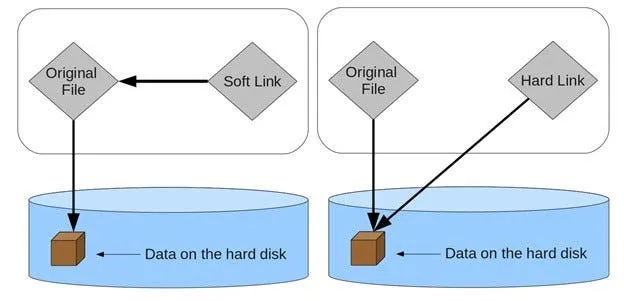
1. Hard Link
A hard link is an exact copy of a file pointing to the same data on disk. It shares the same inode (identity) as the original file. Even if you delete the original file, the hard link still works.
Command to create a hard link:
ln original.txt hardlink.txt
Explanation:
ln– The command to create a link.original.txt– The source file.hardlink.txt– The new hard link pointing to the same data.
Check inode to verify:
ls -li
Both files will have the same inode number.
2. Soft Link (Symbolic Link)
A soft link (also called a symbolic link or symlink) is like a shortcut to another file. It stores the path to the original file. If the original is deleted, the link becomes broken.
Command to create a soft link:
ln -s original.txt softlink.txt
Explanation:
-s– Tellslnto create a symbolic (soft) link.softlink.txt– Acts like a shortcut tooriginal.txt.
Example:
touch file.txt               # Create a file
ln file.txt hardlink.txt     # Create a hard link
ln -s file.txt softlink.txt  # Create a soft link
| Feature | Hard Link | Soft Link (Symbolic Link) |
| Definition | A direct reference to the file's actual data (inode) | A shortcut that points to the original file’s path |
| Command Used | ln file.txt hardlink.txt | ln -s file.txt softlink.txt |
| Inode Number | Same as the original file | Different from the original file |
| Cross-File System Support | ❌ Not allowed | ✅ Allowed |
| Broken If Original Is Deleted? | ❌ No (data still exists) | ✅ Yes (becomes broken) |
| Storage | Shares storage with the original | Stores only the path to the original |
| Used For | Backup, redundancy, versioning | Shortcuts, linking across locations or systems |
List, Set, and Change Standard File Permissions in Linux
Linux uses a permission system to control who can access or modify files and directories. Each file or directory has three types of permissions for three kinds of users.
Understanding File Types and Permissions:
You may see output like this when listing files with ls -l:
-rwxrwxrwx 1 owner group 0 Apr 18 10:00 myfile.txt
Explanation of -rwxrwxrwx:
| Bits | Meaning | Who Does It Apply To |
- | File type (- = file, d = directory) | — |
rwx | Read, write, execute | Owner |
rwx | Read, write, execute | Group |
rwx | Read, write, execute | Others |
The First three
rwxare for the OwnerThe Second
rwxis for the GroupThe Last
rwxis for Others
Who Are the Users?
Owner: The person who owns the file
Group: Users in the same group as the file
Others: Everyone else
List Groups and Change Ownership
View User Groups:
groups #used to see the list of groups
Change Group Ownership:
chgrp group-name file.txt # used to change the group
Change Owner and Group (Together):
sudo chown owner:group file.txt #used to change the owner and group at same time
Example:
sudo chown john:devteam script.sh
Changing Permissions with chmod
Basic Syntax:
chmod <permissions> <file/dir>
You can use symbolic (u, g, o) or octal (numeric) notation.
Add Permission (Using +)
| Target | Symbol | Example | Meaning |
| User | u+ | chmod u+w file | Add write permission to the user |
| Group | g+ | chmod g+rx file | Add read and execute to the group |
| Others | o+ | chmod o+r file | Add read permission to others |
Remove Permission (Using -)
| Target | Symbol | Example | Meaning |
| User | u- | chmod u-w file | Remove write permission from the user |
| Group | g- | chmod g-x file | Remove execute from the group |
| Others | o- | chmod o-r file | Remove read from others |
Set Exact Permission (Using =)
| Target | Symbol | Example | Meaning |
| User | u= | chmod u=rw file | Set user permission to read/write |
| Group | g= | chmod g=r file | Set group permission to read only |
| Others | o= | chmod o= file | Remove all permissions from others |
Octal (Numeric) Permissions
Linux permissions can also be set using numbers:
| Permission | Binary | Octal |
r | 100 | 4 |
w | 010 | 2 |
x | 001 | 1 |
- | 000 | 0 |
Add values for each type (user, group, others):
| User | Group | Others | Example | Meaning |
| 7 | 5 | 5 | 755 | rwx r-x r-x |
| 6 | 4 | 4 | 644 | rw- r-- r-- |
| 7 | 0 | 0 | 700 | rwx --- --- |
Set Permissions Using Octal:
chmod 755 file.sh   # Owner full, group/others read & execute
chmod 644 file.txt  # Owner can read/write, others read-only
chmod 700 script.sh # Only owner has all permissions
Check File Permissions and Details
Using stat command:
stat filename
This shows detailed file information including:
File size
Inode number
Access permissions (both symbolic and octal)
Owner & group
Last access/modification time
Example Output:
stat myfile.txt

  File: myfile.txt
  Size: 0          Blocks: 0          IO Block: 4096   regular file
Device: 802h/2050d Inode: 1288499     Links: 1
Access: 2025-04-18 10:00:00.000000000 +0000
Modify: 2025-04-18 10:00:00.000000000 +0000
Change: 2025-04-18 10:00:00.000000000 +0000
 Birth: -
SUID (Set User ID)
SUID is a special permission that allows users to run an executable with the permissions of the executable's owner, rather than the user running it. Typically, SUID is used for programs that need elevated privileges (like passwd) but should not always be run as the root user.
Syntax to set SUID:
chmod u+s <file-name>Example:
Suppose you have an executable file namedsomefile, and you want to set the SUID permission:sudo chmod u+s somefileChecking SUID:
When the SUID bit is set, it is displayed assin the owner's execute position in the file's permissions string.Example of SUID set:
-rwsr-xr-x 1 root root 12345 Apr 3 13:45 /usr/bin/somefileExplanation: The file has SUID (
sin the owner's execute position), which means it will be executed with the permissions of the file's owner (in this case,root).
Difference between s and S (SUID)
s(lowercase):
The SUID bit is set, and the owner has execute permission. This is the standard case when you have the SUID bit set, and the file can be executed by the user with the owner's permissions.Example:
-rwsr-xr-x 1 root root 12345 Apr 3 13:45 /usr/bin/somefileS(uppercase):
The SUID bit is set, but the owner does not have execute permission. This is less common, but the file still has the SUID bit set. In this case, the owner cannot execute the file, but others can execute it with the owner's privileges.Example:
-rwS--x--x 1 root root 12345 Apr 3 13:45 /usr/bin/somefile
SGID (Set Group ID)
SGID is a similar permission to SUID, but it applies to both executable files and directories. When applied to an executable, the file is executed with the permissions of the group rather than the user running it. When applied to a directory, it ensures that all files created within the directory will inherit the group ownership of the directory.
Syntax to set SGID:
chmod g+s <file-name>Example:
Suppose you have a file namedsgidfile, and you want to set the SGID permission:sudo chmod g+s sgidfileChecking SGID:
When the SGID bit is set, it is displayed assin the group's execute position in the file's permissions string.Example of SGID set:
-rwxr-sr-x 1 user group 12345 Apr 3 13:45 /home/user/sgidfileExplanation: The file has SGID (
sin the group's execute position), meaning it will be executed with the permissions of the file's group.
Difference between s and S (SGID)
s(lowercase):
The SGID bit is set, and the group has execute permission. This is the standard case when you have the SGID bit set, and the file can be executed with the group's permissions.Example:
-rwxr-sr-x 1 user group 12345 Apr 3 13:45 /home/user/sgidfileS(uppercase):
The SGID bit is set, but the group does not have execute permission. This is less common, but the file still has the SGID bit set. In this case, the group cannot execute the file, but the file will still inherit the group's ownership.Example:
-rwxr-Sr-x 1 user group 12345 Apr 3 13:45 /home/user/sgidfile
Using Octal Permissions
chmod Examples:
chmod 4644 <file-name>:
Sets file permissions torw-r--r--.Owner: Read, Write
Group: Read-only
Others: Read-only
chmod 4644 somefile
chmod 4764 <file-name>:
Sets file permissions torw-rw-r--.Owner: Read, Write
Group: Read, Write
Others: Read-only
chmod 4764 sgidfile
Finding Files Using SUID and SGID
You can search for files that have SUID or SGID set using the find command.
Find files with SUID:
find . -perm /4000This command finds all files with the SUID bit set.
Find files with SGID:
find . -perm /2000This command finds all files with the SGID bit set.
Combining SUID and SGID
You can set both the SUID and SGID bits on a file at the same time. This is typically done for special files where both owner and group permissions are necessary.
Example:
Create a file:
touch both-SUID_SGIDSet both SUID and SGID:
sudo chmod u+s,g+s both-SUID_SGIDVerify the permissions:
ls -l both-SUID_SGIDExample output:
-rwsr-sr-x 1 user group 12345 Apr 18 10:00 both-SUID_SGID
Explanation:
sIn the owner’s execute position: The SUID bit is set, and the owner has execute permission.sIn the group’s execute position: The SGID bit is set, and the group has execute permission.
Sticky Bit
The Sticky Bit is a special permission used primarily on directories. When applied to a directory, it ensures that only the owner of the file (or the root user) can delete or rename files within that directory, even if other users have write access to the directory. This permission is commonly used on directories like /tmp to prevent unauthorised file removal by users who have write access to the directory.
How to Set the Sticky Bit
You can set the sticky bit using either the chmod command with the +t option or by specifying the octal mode 1776.
Examples:
Create a directory:
mkdir stickydirSet the Sticky Bit using
+t: This command sets the sticky bit and gives read, write, and execute permissions to the owner, and read and execute permissions to the group and others.chmod +t stickydirSet the Sticky Bit using octal notation (1776): This sets the permissions for the directory as:
Owner: read, write, execute
Group: read, write, execute
Others: read, write, execute
Sticky bit is also set to ensure only the owner can delete or rename their files.
chmod 1776 stickydir
Set the Sticky Bit without execute for others using octal notation (1666): This removes execute permission for others, but the sticky bit is still set, and only the owner can delete/rename files within the directory.
chmod 1666 stickydir
Verifying the Sticky Bit
When the Sticky Bit is set, you will see the t in the others' execute position in the directory’s permissions. If the Sticky Bit is not set, you will see a - in that position.
Example:
With Sticky Bit set (using
1776or+t):drwxrwxrwt 2 user user 4096 Apr 18 10:00 stickydirWithout Sticky Bit set (using
1666or removing+t):drwxrw-rw- 2 user user 4096 Apr 18 10:00 stickydir
Explanation of Permissions:
rwx: The owner can read, write, and execute files in the directory.rwx: The group can read, write, and execute files in the directory.rwt: Others can read and write files in the directory, but only the owner can delete or rename their files due to the Sticky Bit (t).
Why Use the Sticky Bit?
The Sticky Bit is commonly used on directories where multiple users have write access but should not be able to delete or modify each other's files. One example is the /tmp directory, which is used for temporary file storage. Without the Sticky Bit, any user with write permissions could delete or modify any file in that directory, which could cause issues with other users' processes.
Example Use Case:
In a multi-user environment, you might create a temporary directory for users to store files. You want all users to be able to create files, but only the owner of a file should be able to delete or rename it. Setting the Sticky Bit on that directory ensures that users cannot delete or rename each other's files, even though they all have write access to the directory.
Searching files and Directories:
The find command in Linux is used to search for files and directories in a specified location based on various criteria, such as file name, size, type, permissions, and more.
1. Searching Files by Name
The -name option allows you to search for files and directories by their name. You can use wildcards (*, ?) to match patterns in the filenames.
Syntax:
find <path> -name "<filename>"
Examples:
Find a file named
myfile.txtin the current directory and subdirectories:find . -name "myfile.txt"Find all
.logfiles:find . -name "*.log"Find files starting with
data_:find . -name "data_*"
2. Searching Files by Type
The -type option allows you to search for specific types of files. Common types include:
ffor regular filesdfor directorieslfor symbolic links
Syntax:
find <path> -type <type>
Examples:
Find all directories:
find . -type dFind all regular files:
find . -type fFind all symbolic links:
find . -type l
3. Searching Files by Size
The -size option allows you to search for files based on their size. You can specify the size in bytes, kilobytes, megabytes, gigabytes, etc.
Syntax:
find <path> -size <size>
Examples:
Find files larger than 100 MB:
find . -size +100MFind files smaller than 10 KB:
find . -size -10kFind files exactly 1 GB in size:
find . -size 1G
4. Searching Files by Time
You can use the -mtime, -atime, and -ctime options to search for files based on their modification, access, or status change time.
-mtime n: Modifiedndays ago-atime n: Accessedndays ago-ctime n: Status changedndays ago+n: More thanndays ago-n: Less thanndays ago
Syntax:
find <path> -mtime <+|-|n>
Examples:
Find files modified more than 7 days ago:
find . -mtime +7Find files modified within the last 7 days:
find . -mtime -7Find files accessed within the last 24 hours:
find . -atime -1
5. Searching Files by Permissions
The -perm option allows you to search for files with specific permissions. You can specify permissions in either symbolic (e.g., rwx) or numeric (e.g., 755) format.
Syntax:
find <path> -perm <permissions>
Examples:
Find files with
755permissions:find . -perm 755Find files with read, write, and execute permissions for owner and group (
775):find . -perm 775Find files that are writable by others (
666):find . -perm /222
6. Searching Files by User or Group
You can use the -user and -group options to search for files owned by a specific user or group.
Syntax:
find <path> -user <username>
find <path> -group <groupname>
Examples:
Find files owned by user
john:find . -user johnFind files owned by group
admins:find . -group admins
7. Searching for Empty Files or Directories
To search for empty files or directories, use the -empty option.
Syntax:
find <path> -empty
Examples:
Find empty files:
find . -empty -type fFind empty directories:
find . -empty -type d
8. Searching for Files Using Wildcards
You can use wildcards (*, ?, and []) to search for files with specific patterns in their names.
Syntax:
find <path> -name "<pattern>"
Examples:
Find all
.txtfiles:find . -name "*.txt"Find all files starting with
log:find . -name "log*"Find files that have a single character after
file_:find . -name "file_?"
9. Performing Actions on Found Files
You can perform actions on the files you find using the -exec option. Common actions include deleting, modifying permissions, or moving files.
Syntax:
find <path> -name "<filename>" -exec <command> {} \;
Examples:
Delete all
.bakfiles:find . -name "*.bak" -exec rm {} \;Make all
.shfiles executable:find . -name "*.sh" -exec chmod +x {} \;Move all
.txtfiles to a backup directory:find . -name "*.txt" -exec mv {} /path/to/backup/ \;
10. Searching for Files with Specific Inode
The -inum option allows you to search for files by their inode number.
Syntax:
find <path> -inum <inode_number>
Examples:
Find a file with inode number
12345:find . -inum 12345
11. Combining Multiple Criteria
You can combine multiple search criteria using logical operators such as -and, -or, and -not.
Syntax:
find <path> <criteria1> -and <criteria2>
Examples:
Find
.txtfiles larger than 1MB:find . -name "*.txt" -and -size +1MFind files modified within the last 7 days that are owned by user
john:find . -user john -and -mtime -7
Pagers and Their Types
In Linux, pagers are programs that allow you to view (but not edit) long outputs one screen at a time. They are especially useful when dealing with lengthy command outputs, configuration files, or system logs.
There are mainly two popular pagers:
Less
More
1. Less
lessis a powerful pager that allows both forward and backward navigation through the content.It loads the content as needed (on-demand), making it faster with very large files.
It supports searching, scrolling, and navigation without loading the entire file into memory at once.
Command Syntax:
less <file-name>
Example:
less /var/log/log.txt
This command opens the
/var/log/log.txtfile withlessand allows you to scroll through it.You can move:
Forward by pressing the
SpacekeyBackward by pressing the
bkeySearch inside the file by typing
/search_termExit
lessby pressingq
2. More
moreis an older and simpler pager compared toless.It mainly supports forward-only navigation.
It reads the file sequentially and does not support backward scrolling.
Command Syntax:
more <file-name>
Example:
sudo more /var/log/log.txt
This command displays the file page by page.
You can:
Move forward one page by pressing
SpaceMove forward one line by pressing
EnterExit
moreby pressingq
Vim Editor
Vim (Vi Improved) is a powerful, efficient, and widely used text editor in Linux systems. It is an enhanced version of the older vi editor and is designed to edit text efficiently.
Vim works in different modes, which is important to understand before using it.
Modes in Vim
| Mode | Description |
| Normal Mode | Default mode for navigation and commands |
| Insert Mode | Mode for inserting or editing text |
| Visual Mode | Mode for selecting text |
| Command Mode | Mode for executing commands like save, quit, etc. |
Opening a File in Vim
Syntax:
vim <file-name>
Example:
vim myfile.txt
If
myfile.txtexists, it will open the file.If it does not exist, it will create a new file with that name.
Basic Usage Steps
1. Switching to Insert Mode
When you first open Vim, you are in Normal Mode (you cannot directly type text).
To start typing, press:
i→ Insert before the cursorI→ Insert at the beginning of the linea→ Insert after the cursorA→ Insert at the end of the line
Now, you can start typing your content.
2. Saving and Quitting
After editing your file:
- Press
Escto return to Normal Mode.
Then type:
:w→ Save the file:q→ Quit Vim:wq→ Save and Quit:q!→ Quit without saving (force quit)
Examples:
:w       # Save
:q       # Quit
:wq      # Save and Quit
:q!      # Force Quit without saving
Common Commands in Vim
| Command | Action |
i | Insert before cursor |
a | Insert after cursor |
o | Open a new line below |
Esc | Exit to Normal Mode |
:w | Save the file |
:q | Quit |
:wq | Save and quit |
:q! | Quit without saving |
/text | Search for "text" forward |
n | Repeat search forward |
N | Repeat search backward |
dd | Delete (cut) the current line |
yy | Copy (yank) the current line |
p | Paste below the cursor |
u | Undo last action |
Ctrl + r | Redo the undone change |
Exiting Vim Quickly
| Command | Meaning |
Esc :wq | Save and Exit |
Esc :q! | Quit Without Saving |
Esc ZZ | Save and Exit (shortcut) |
Simple Example
Open a file:
vim notes.txtPress
ito enter Insert Mode.Type some text:
This is my first file using Vim.Press
Escto return to Normal Mode.Save and exit:
:wq
Searching Files Using grep
The grep the command is used in Linux to search for specific patterns within files or outputs.
It is a powerful tool that supports simple to advanced searching operations.
Basic Syntax:
grep [options] 'pattern' filename
Useful grep Options
| Option | Description |
-i | Ignore case while matching |
-r | Search recursively through all files and subdirectories |
-ri | Recursive search, ignoring case |
-vi | Invert match (show lines that do NOT match) while ignoring case |
-wi | Match the whole word only (case-insensitive) |
-oi | Print only the matched part of the line (case-insensitive) |
Examples
1. Simple Search
grep "Linux" file.txt
- Searches for the word "Linux" in
file.txt(case-sensitive).
2. Ignore Case (-i)
grep -i "linux" file.txt
- Searches for "linux" or "Linux" or "LiNuX" (any case combination).
3. Recursive Search (-r)
grep -r "error" /var/log
- Recursively searches for "error" in
/var/logand its subdirectories.
4. Recursive and Ignore Case (-ri)
grep -ri "failed" /var/log
- Recursively searches for "failed" or "FAILED" or "FaIlEd" in
/var/log.
5. Invert Match with Ignore Case (-vi)
grep -vi "success" result.txt
- Displays all lines that do not contain "success" (case-insensitive) from
result.txt.
6. Match Whole Word with Ignore Case (-wi)
grep -wi "server" config.txt
- Searches only for the whole word "server", not words like "servername" or "myserver".
7. Print Only Matched Part with Ignore Case (-oi)
grep -oi "error" /var/log/syslog
- Displays only the matched word "error" instead of the entire line, ignoring case.
Overview Table
| Task | Command Example |
| Simple search | grep "pattern" filename |
| Ignore case | grep -i "pattern" filename |
| Recursive search | grep -r "pattern" directory |
| Recursive + Ignore case | grep -ri "pattern" directory |
| Invert match (not matching lines) | grep -vi "pattern" filename |
| Match whole word | grep -wi "pattern" filename |
| Only show matched word | grep -oi "pattern" filename |
Basic Regular Expressions (Regex) in Linux
Regular Expressions (Regex) are patterns used to match character combinations in text.
They are extremely powerful for searching, filtering, and manipulating text data.
In Linux, tools like grep, sed, and awk use regex for powerful text processing.
Regex Operators and Examples
| Operator | Meaning | Example | Explanation |
^ | Matches the start of a line | ^Hello | Matches lines that start with "Hello" |
$ | Matches the end of a line | world$ | Matches lines that end with "world" |
. | Matches any single character | h.t | Matches "hat", "hit", "hot", etc. |
* | Matches zero or more of the preceding character | lo* | Matches "l", "lo", "loo", "looo", etc. |
+ | Matches one or more of the preceding characters | lo+ | Matches "lo", "loo", "looo" but not "l" |
{} | Match a specific number of repetitions | a{3} | Matches "aaa" exactly |
? | Matches zero or one occurrence | colou?r | Matches both "color" and "colour" |
[] | Matches any one character inside brackets | [aeiou] | Matches any vowel |
() | Group expressions together | (ab)+ | Matches "ab", "abab", "ababab", etc. |
[^] | Matches any character NOT inside brackets | [^0-9] | Matches any non-digit character |
Using AND / OR in Regex
| Operation | Symbol | Example | Explanation | ||
| AND (default) | No symbol needed | abc | Matches "abc" together (a followed by b followed by c) | ||
| OR | ` | ` | `cat | dog` | Matches "cat" or "dog" |
Examples in Linux using grep
1. Start of a Line ^
grep "^Error" logfile.txt
- Matches lines that start with "Error".
2. End of a Line $
grep "Success$" logfile.txt
- Matches lines that end with "Success".
3. Any Character .
grep "b.t" words.txt
- Matches "bat", "bit", "bot", etc.
4. Zero or More Times *
grep "lo*" text.txt
- Matches "l", "lo", "loo", "looo".
5. One or More Times +
grep -E "lo+" text.txt
- Matches "lo", "loo", but NOT "l". (
-Eenables extended regex for+).
6. Specific Repetitions {}
grep -E "a{3}" text.txt
- Matches "aaa".
7. Zero or One Occurrence ?
grep -E "colou?r" text.txt
- Matches both "color" and "colour".
8. Character Set []
grep "[aeiou]" vowels.txt
- Matches any single vowel.
9. Grouping ()
grep -E "(ab)+" file.txt
- Matches "ab", "abab", etc.
10. Negated Set [^]
grep "[^0-9]" file.txt
- Matches any character that is NOT a digit.
11. OR Operator \|
grep -E "cat\|dog" pets.txt
- Matches either "cat" or "dog".
Archive, Compress, Unpack, and Uncompress Files in Linux
Managing file size and organizing files efficiently is crucial in Linux.
We use different tools to archive and compress files and directories.
Archiving Files - tar Command
tarstands for Tape Archive.It is used to bundle multiple files/directories into a single archive file (without compression by default).
Creating an Archive
tar -cvf archive.tar file1 file2 dir1
c→ create a new archivev→ verbose (show progress)f→ filename of the archive
Creates
archive.tarcontainingfile1,file2, anddir1.
Extracting an Archive
tar -xvf archive.tar
x→ extract files from the archive
Compressing and Uncompressing Files
After creating a .tar archive, we often compress it to save space.
Or we can compress individual files directly.
gzip & gunzip
gzip compresses a file.
gunzip decompresses a
.gzfile.
Compress a File using gzip
zip file.txt
- Compresses
file.txtintofile.txt.gzand removes the original file.
Decompress a File using gunzip
zip file.txt.gz
- Restores
file.txtfromfile.txt.gz.
bzip2 & bunzip2
bzip2 offers better compression than gzip (but slower).
bunzip2 decompresses
.bz2files.
Compress a File using bzip2
bzip2 file.txt
- Creates
file.txt.bz2.
Decompress a File using bunzip2
bunzip2 file.txt.bz2
- Restores
file.txt.
xz & unxz
xz offers very high compression ratios (better than gzip and bzip2).
unxz decompresses
.xzfiles.
Compress a File using xz
xz file.txt
- Creates
file.txt.xz.
Decompress a File using unxz
unxz file.txt.xz
- Restores
file.txt.
Archive and Compress Together
In Linux, you can create an archive and compress it at the same time using the tar command with specific options.
This saves time and produces a single compressed file that is easy to transfer, store, and back up.
The combined commands are very popular and widely used in real-world Linux tasks.
Syntax
tar -[options] [archive-name] [file(s)/directory(s)]
Where options:
c→ create an archivev→ verbose (show progress)f→ specify filenamez→ compress with gzipj→ compress with bzip2J→ compress with xz
Examples
1. Create and Compress Using gzip (.tar.gz)
tar -czvf project.tar.gz project/
c→ createz→ compress with gzipv→ show progressf→ output filenameproject/→ folder to archive
Explanation:
This will create a compressed file project.tar.gz that contains all files inside the project/ directory.
2. Create and Compress Using bzip2 (.tar.bz2)
tar -cjvf backup.tar.bz2 backup/
j→ compress with bzip2
Explanation:
Creates a .tar.bz2 file with better compression than gzip.
File created: backup.tar.bz2.
3. Create and Compress Using xz (.tar.xz)
tar -cJvf source-code.tar.xz src/
J→ compress with xz
Explanation:
This creates a highly compressed source-code.tar.xz archive from the src/ directory.
Extracting Compressed Archives
| File Type | Extract Command |
.tar.gz | tar -xzvf archive.tar.gz |
.tar.bz2 | tar -xjvf archive.tar.bz2 |
.tar.xz | tar -xJvf archive.tar.xz |
Quick Table Summary
| Compression Type | Command | Result |
| Tar + gzip | tar -czvf archive.tar.gz files/ | Create .tar.gz archive |
| Tar + bzip2 | tar -cjvf archive.tar.bz2 files/ | Create .tar.bz2 archive |
| Tar + xz | tar -cJvf archive.tar.xz files/ | Create .tar.xz archive |
Small Real-World Example
Suppose you have a folder called website/ and you want to back it up as a compressed file.
tar -czvf website-backup.tar.gz website/
A file
website-backup.tar.gzwill be created.You can move this single file to another server, USB drive, or cloud storage.
To extract later:
tar -xzvf website-backup.tar.gz
It will restore the website/ folder as it was.