Devops - Docker Containerization.
Learning Docker Essential from Basic.

I'm a pre-final year computer Science and Design student.
What is Docker?
Docker is an open-source platform designed to automate application deployment, scaling, and management in lightweight, portable containers. It allows developers to package an application and its dependencies (like libraries, tools, and runtime) into a standardised container unit. These containers can run consistently on different environments, such as a developer's machine, a test server, or a production cloud environment.
Why Docker?
Docker has become a popular tool in modern software development for several reasons. Its ability to simplify deployment and streamline workflows makes it an essential tool for developers, DevOps teams, and system administrators. Here are some key reasons why Docker is widely adopted:
1. Consistent Environments
Docker ensures that applications run the same way in any environment by packaging all dependencies, libraries, and configurations into a container. This eliminates the "works on my machine" problem, making development more reliable and predictable.
2. Portability Across Platforms
Docker containers are highly portable. You can run your application in any environment that supports Docker, from local development setups to cloud platforms, without worrying about compatibility issues.
3. Resource Efficiency
Unlike traditional virtual machines (VMs), Docker containers share the host OS’s kernel, making them more lightweight and efficient. Containers start up much faster and use fewer system resources, allowing you to run more applications on the same infrastructure.
4. Scalability and Microservices
Docker makes it easier to implement a microservices architecture by isolating each service in its container. This allows you to scale individual components independently, improving your application's overall scalability and performance.
5. Version Control for Applications
With Docker, you can version control your application environment just like you would with code. Docker images can be built, tested, and distributed as immutable versions, making it easy to roll back to a previous state if needed.
6. Faster CI/CD Pipelines
Docker accelerates Continuous Integration/Continuous Deployment (CI/CD) pipelines by enabling faster builds, testing, and deployment. It ensures consistency across all stages of development, testing, and production, minimizing deployment issues.
7. Isolation and Security
Docker containers provide isolated environments for running applications. This separation ensures that one application doesn’t interfere with another, improving security and stability.
Docker Architecture
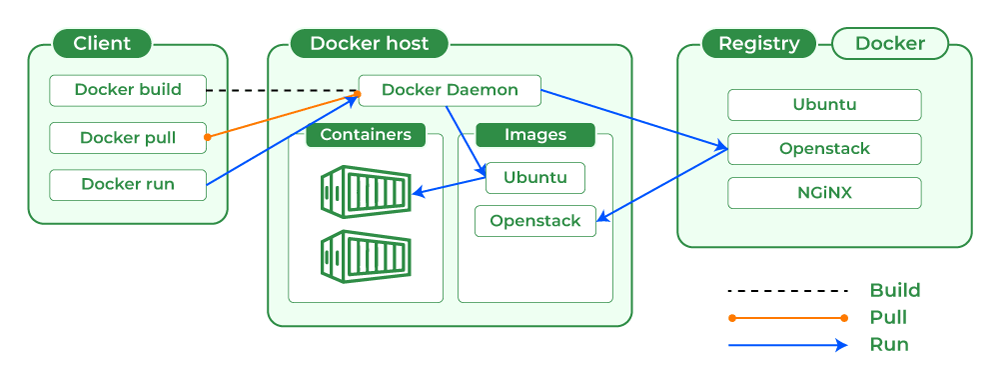
Docker’s architecture consists of several components working together to create, manage, and run containers. Docker follows a client-server architecture at its core, enabling developers to interact with containers using high-level commands.
1. Docker Engine
The Docker Engine is the core of Docker, responsible for creating and running containers. It consists of three main components:
Docker Daemon: A background service that manages containers, images, networks, and volumes. It listens to Docker API requests and performs the requested tasks.
Docker Client: The command-line interface (CLI) that users interact with to issue commands like
docker build,docker run, anddocker pull. The client sends these commands to the Docker Daemon for execution.REST API: Provides programmatic control over Docker. To automate container management, you can send HTTP requests to the Docker Daemon through this API.
2. Docker Objects
Docker uses the following objects to perform its operations:
Images: A Docker image is a lightweight, standalone, and executable package that includes everything an application needs to run (code, libraries, dependencies). Images are read-only templates used to create containers.
Containers: A running instance of a Docker image. Containers are isolated environments that package and run applications. They can be started, stopped, deleted, and moved between environments.
Volumes: Used to persist data generated by and used by Docker containers. Volumes are stored outside the container's filesystem and are the preferred method for sharing data between the host and container.
3. Docker Registries
Docker Registries are used to store and distribute Docker images. The most common registry is Docker Hub, which hosts public and private images. Docker can also interact with other registries or private registries.
Docker Hub: The default public registry where users can find and share containerized applications.
Private Registries: Custom registries that can be set up to host proprietary Docker images securely.
4. Docker Architecture Diagram
Here’s a basic representation of Docker’s architecture:
5. How It All Works Together
Build: A developer writes a
Dockerfile(a script defining how an image is created) and uses the Docker Client to build an image. This image is sent to the Docker Daemon, which creates the container image.Pull & Push: Docker images can be pulled from a registry (like Docker Hub) or pushed to it for distribution.
Run: The Docker Daemon creates containers from images when a
docker runcommand is issued. Each container runs in isolation with its own file system, processes, and network settings.
Docker vs. Virtual Machines (VMs)
Both Docker and virtual machines are used to run applications in isolated environments, but they differ fundamentally in how they operate
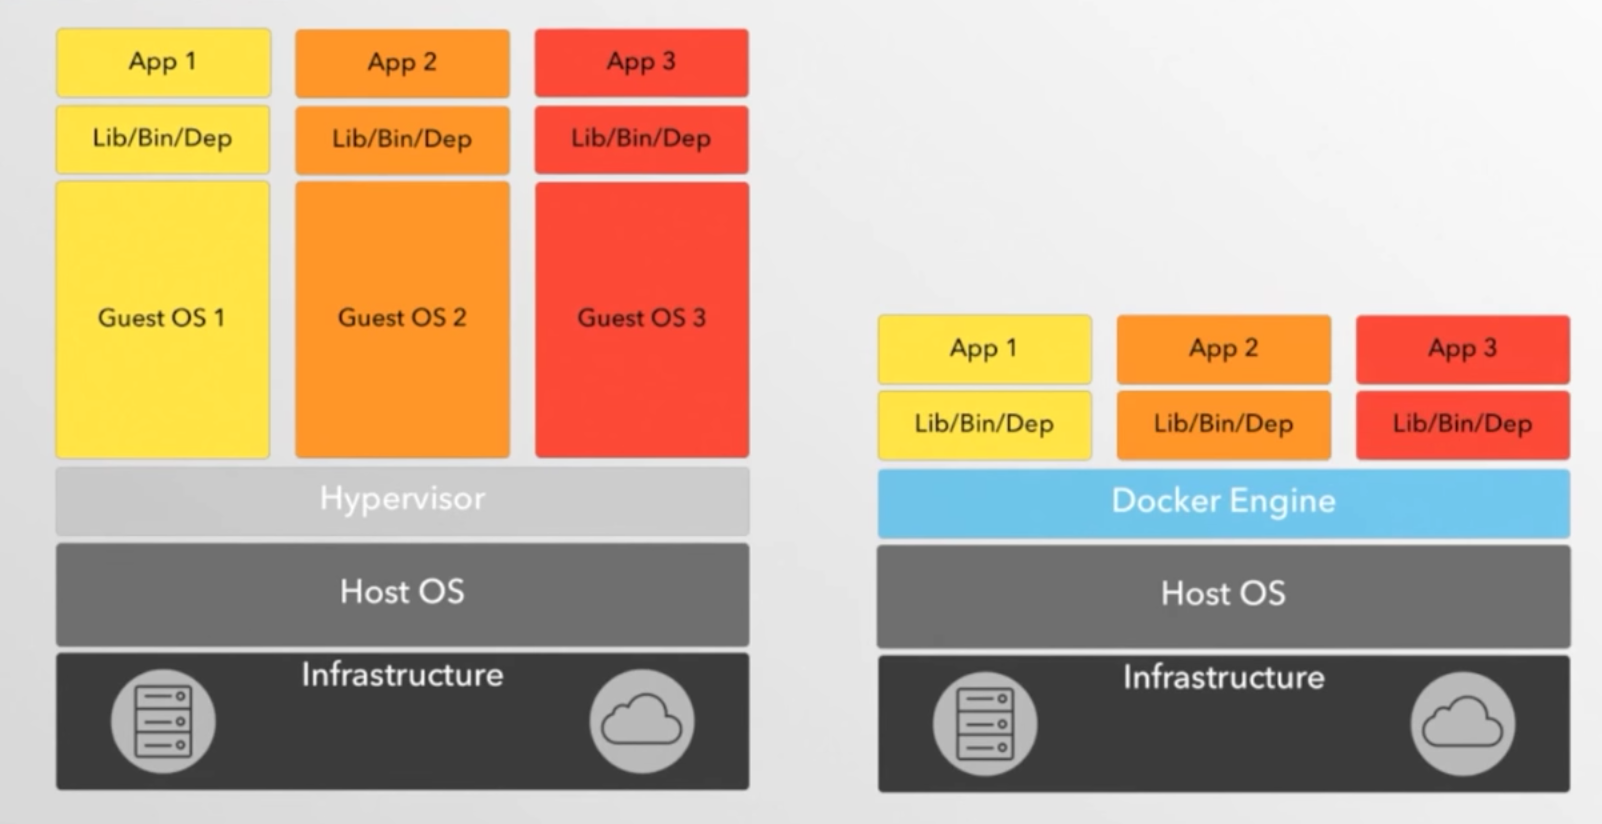
.
| Feature | Docker | Virtual Machines (VMs) |
| Architecture | Containers share the host OS kernel | Each VM includes a full guest OS |
| Performance | Lightweight, fast, and efficient | Heavier, slower due to full OS overhead |
| Resource Usage | Shares resources with minimal overhead | Requires dedicated resources for each VM |
| Startup Time | Starts in seconds | Takes minutes to boot up the guest OS |
| Portability | Highly portable across different environments | Less portable due to full OS dependencies |
| Isolation | Process-level isolation shares the host OS | Full OS-level isolation (stronger security) |
| Scalability | Easily scalable with less resource usage | Less efficient for scaling multiple VMs |
| Use Case | Ideal for microservices and fast CI/CD pipelines | Ideal for running multiple OS environments |
| Examples | Docker Engine, Kubernetes | VMware, VirtualBox, Hyper-V |
What are Docker Images?
A Docker Image is a lightweight, standalone, and executable package that includes everything needed to run an application. It contains the application code, libraries, dependencies, environment variables, and configurations.
Key Characteristics:
Read-only: Docker images are immutable (cannot be changed once built). Any changes made during runtime are stored in a new container layer.
Layers: Each image is built from a series of layers. Layers represent changes made to the image (e.g., installing a library). When you modify an image, only the changed layers are updated.
Base Image: A base image is the foundational image from which custom images are created (e.g.,
ubuntu,node,alpine).Custom Images: You can create custom images by writing a Dockerfile, which defines the steps to build the image (e.g., installing software, copying files).
Workflow:
Build: You create an image by writing a
Dockerfileand runningdocker build.Store: The image can be stored in a Docker Registry (e.g., Docker Hub) for future use.
Run: The image is used to create a container with the
docker runcommand.
What is a Docker Container?
A Docker Container is a lightweight, standalone, and executable unit of software that packages an application and its dependencies. It runs isolated processes on a shared host operating system but behaves as if it is an independent system.
Key Characteristics:
Isolation: Containers run in isolation, with their own file system, network, and process space. This ensures that each container operates independently of other containers and the host system.
Portability: Containers are portable and can run across any system that supports Docker, making it easy to move applications between environments (e.g., development, testing, production).
Efficiency: Since containers share the host OS kernel, they are more resource-efficient than traditional virtual machines, using fewer resources and starting up much faster.
Ephemeral: Containers are usually short-lived and can be created, started, stopped, or destroyed quickly. Any changes made inside the container during runtime are not saved unless explicitly persisted.
Workflow:
Create: Containers are created from Docker Images. When you run an image with
docker run, a container is created.Run: Containers encapsulate an application and all its dependencies, running isolated processes as defined by the image.
Stop: Containers can be stopped or removed, and new containers can be created from the same image at any time.
Example Use:
You can run multiple microservices in separate containers on the same machine, each with its dependencies and configurations.
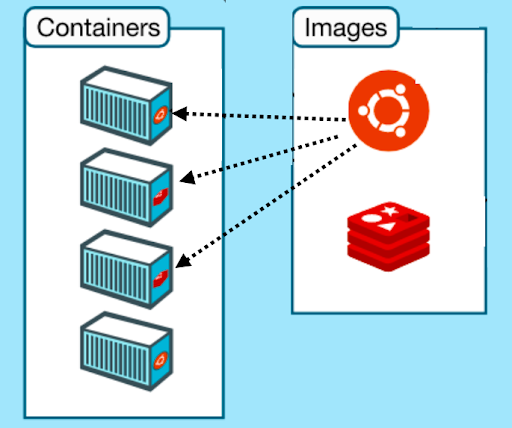
Difference between Docker Images and Docker Containers
In general, Docker Images are templates that contain all the necessary instructions and components to run an application. Within Docker Containers, these images are executed as isolated instances, allowing the application to run.
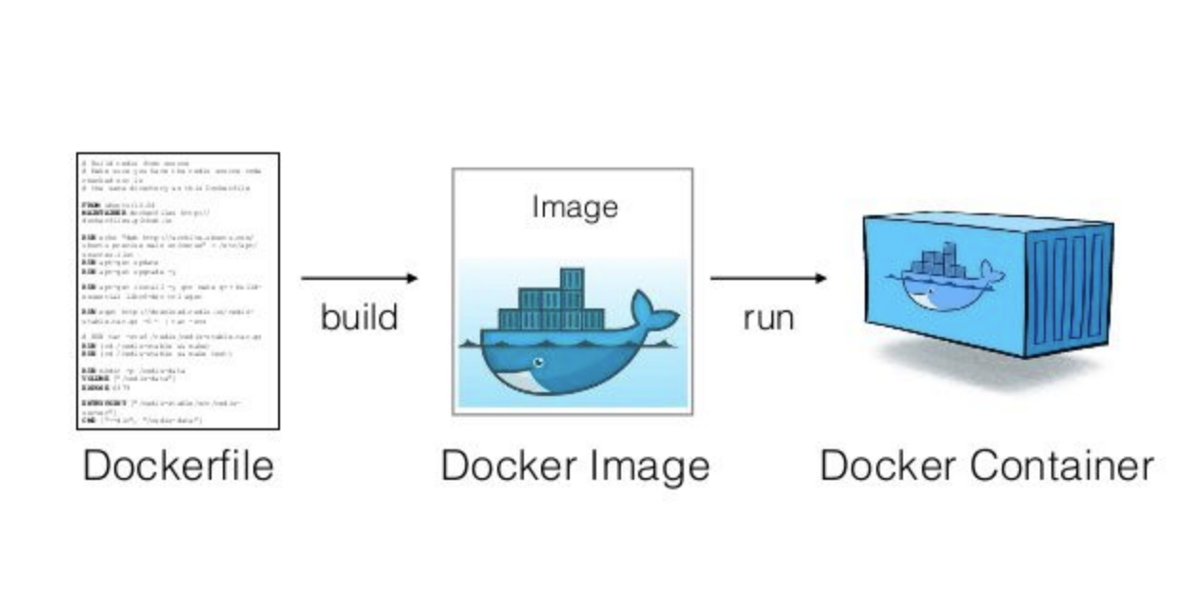
General Difference Table
| Feature | Docker Image | Docker Container |
| Definition | A lightweight, standalone package that contains all the necessary components (code, libraries, dependencies) to run an application. | A running instance of a Docker image that executes the application in an isolated environment. |
| State | Read-only and static (cannot be changed after creation). | Read-write and dynamic (can change during runtime). |
| Lifecycle | Built once and used to create multiple containers. | Created, started, stopped, and deleted based on usage. |
| Usage | Acts as a template for creating containers. | Executes the application based on the image. |
| Portability | Can be pushed to a registry (e.g., Docker Hub) and pulled to different environments. | Runs in the local environment, created from a pulled or built image. |
| Persistence | Changes are saved in a new image layer when rebuilt. | Changes do not persist unless explicitly saved (i.e., committing to a new image). |
| Size | Lightweight, as it includes only the required dependencies and configurations. | Requires additional resources when running but is still lightweight compared to VMs. |
| Example Command | docker build (to create an image). | docker run (to create and run a container). |
Docker Commands Overview
Docker commands are used to interact with Docker, enabling users to manage containers, images, networks, and volumes. These commands help you create, run, stop, and remove containers and images in a simplified manner. The commands are often paired with flags to modify their behaviour, with short flags (-) and long flags (--).
Common Docker Commands
1. docker run
Explanation:
Thedocker runcommand creates and starts a new container from a specified image. It is one of the most frequently used Docker commands. When you run this command, Docker checks if the image is available locally, and if not, it pulls the image from a Docker registry (e.g., Docker Hub). You can use options like detached mode, port mappings, and container names.Example:
-d: Runs the container in detached mode (background).-p 8080:80: Maps port 8080 on the host to port 80 inside the container.--name mycontainer: Assigns a namemycontainerto the container.nginx: Specifies the image (in this case, NGINX).
docker run -d -p 8080:80 --name mycontainer nginx
2. docker build
Explanation:
Thedocker buildcommand creates a Docker image from aDockerfile. This command allows you to package your application along with its dependencies and environment. The build context refers to the files in the current directory or specified location.Example:
docker build -t myapp:latest .-t: Tags the image with a name and version (e.g.,myapp:latest)..: Refers to the build context (current directory).
This command builds an image named myapp from Dockerfile in the current directory.
3. docker ps
Explanation:
Thedocker pscommand lists all running containers. It shows useful information such as container ID, image, status, and ports in use.Example:
docker psThis command will display a list of running containers.
If you want to see all containers, including stopped ones:
docker ps -a
4. docker stop
Explanation:
Thedocker stopcommand stops a running container gracefully by sending a termination signal, allowing the container to shut down cleanly.Example:
docker stop mycontainerThis stops the container named
mycontainer.
5. docker rm
Explanation:
Thedocker rmcommand removes stopped containers. It is useful for cleaning up containers that are no longer needed.Example:
docker rm mycontainerThis command removes the container named
mycontainer(it must be stopped).If you want to remove all stopped containers, use:
docker container prune
6. docker rmi
Explanation:
Thedocker rmicommand removes Docker images from your system. This helps in freeing up disk space by removing unused or unnecessary images.Example:
docker rmi myapp:latestThis removes the Docker image named
myappwith the taglatest.
7. docker exec
Explanation:
Thedocker execcommand allows you to run additional commands in a running container. This is useful when you need to inspect or modify a running container.Example:
docker exec -it mycontainer bash-it: Enables interactive mode with a pseudo-TTY.mycontainer: The name or ID of the running container.bash: Runs the bash shell inside the container.
This will start an interactive bash session inside the container.
Docker Flags Overview
Single Dash Flags (-)
Single dash flags are short options used to modify Docker commands. Examples include:
-d: Runs containers in detached mode.-p: Maps ports between the host and the container.-t: Allocates a pseudo-TTY (useful for running commands interactively).-it: Combines-i(interactive) and-t(pseudo-TTY) for interactive container sessions.Example:
docker run -d -p 8080:80 nginx
Double Dash Flags (--)
Double dash flags are long options that provide more descriptive flags for commands:
--name: Assign a custom name to the container.--rm: Automatically removes the container after it stops.--env: Passes environment variables into the container.Example:
docker run --name mycontainer --rm nginx
Summary of Docker Commands
| Command | Description | Example |
| docker run | Creates and starts a container from a Docker image. | docker run -d -p 8080:80 --name mycontainer nginx |
| docker build | Builds a Docker image from a Dockerfile. | docker build -t myapp:latest . |
| docker ps | Lists running containers. | docker ps |
| docker stop | Stops a running container. | docker stop mycontainer |
| docker rm | Removes stopped containers. | docker rm mycontainer |
| docker rmi | Removes Docker images. | docker rmi myapp:latest |
| docker exec | Executes a command inside a running container. | docker exec -it mycontainer bash |
By understanding these basic commands, you can effectively manage Docker containers and images to build, run, and scale your applications efficiently and for more docker-cheat-sheet.
Dockerfile
What is a Dockerfile?
In simple terms, a Dockerfile is like a blueprint or a recipe for creating a Docker image. It's a plain text file that contains a set of instructions that Docker follows, step-by-step, to automatically build an environment for your application. These instructions guide the creation of a Docker image by telling Docker exactly what software to install, files to copy, and configurations to set up.
The Components of a Dockerfile
A Dockerfile uses a specific set of instructions to build your image step-by-step. Think of these as the essential commands that tell Docker what to do. Here are the most common ones you'll use:
FROM: This is almost always the very first instruction. It specifies the base image your new image will be built upon. This could be a base operating system (like Ubuntu) or an image pre-configured with a language runtime (like Node.js or Python).
WORKDIR: Sets the working directory inside the Docker image for all subsequent instructions like RUN, COPY, or CMD. It's like navigating to a specific folder on your computer before running commands.
COPY: Used to copy files and directories from your local machine (where you're building the image) into the Docker image's filesystem. This is how you get your application code, configuration files, or other assets into the image.
RUN: Executes commands in a new layer on top of the current image. You'll typically use RUN to install software, download dependencies, compile code, or perform any setup tasks needed for your application.
EXPOSE: Informs Docker that the container will listen on specific network ports at runtime. It serves as documentation for users and tools, indicating which ports the application inside the container uses. It doesn't actually publish the port; that's done when you run the container.
CMD: Provides the default command or arguments that will be executed when the container starts. You can only have one CMD instruction in a Dockerfile; if you include multiple, only the last one will be active.
ENV: Sets environment variables within the Docker image. These variables can then be accessed and used by the application running inside the container, which is useful for configurations like database connections or API keys.
Our First Dockerfile: A Simple 'Hello World' Web App
Objective: Our goal here is straightforward: we'll walk through the entire Dockerfile workflow by creating a simple web application that displays 'Hello From Dockerfile' in your browser. This hands-on example will give you a practical understanding of how Dockerfiles work, from definition to execution.
STEP 1: Set Up Your Project Files
The very first thing we need to do is create the foundational files for our Dockerized web app: a Dockerfile and an index.html file
Create your
index.htmlfile: This HTML file will contain the simple message our web server will display. Create a file namedindex.htmlin your project directory and add the following content:<!DOCTYPE html> <html lang="en"> <head> <meta charset="UTF-8"> <meta name="viewport" content="width=device-width, initial-scale=1.0"> <title>Hello Docker</title> </head> <body> <h1>Hello From Dockerfile!</h1> </body> </html>Create an empty
Dockerfile: Next, create a new file namedDockerfile(with no file extension) in the same directory as yourindex.html. For now, you can leave it empty, as we'll fill it with instructions in the next step.
STEP 2: Crafting Your Dockerfile
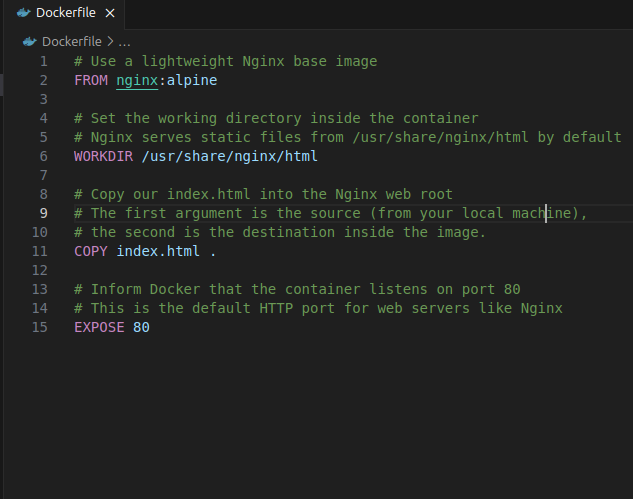
Now that we have our index.html ready, it's time to write the actual Dockerfile that will tell Docker how to build our image. Open the Dockerfile you created in Step 1 and add the following lines:
# Use a lightweight Nginx base image
FROM nginx:alpine

# Set the working directory inside the container
# Nginx serves static files from /usr/share/nginx/html by default
WORKDIR /usr/share/nginx/html

# Copy our index.html into the Nginx web root
# The first argument is the source (from your local machine),
# the second is the destination inside the image.
COPY index.html .

# Inform Docker that the container listens on port 80
# This is the default HTTP port for web servers like Nginx
EXPOSE 80
Let's break down what each of these lines means in the context of your Dockerfile:
FROM nginx:alpine:Here, we're using the
FROMinstruction to specify our base image. We've chosennginx:alpine.nginxis a popular, high-performance web server.:alpineindicates a very small, lightweight version of Nginx built on Alpine Linux, which keeps our final image size minimal. This base image already includes Nginx and its necessary components.
WORKDIR /usr/share/nginx/html:The
WORKDIRInstruction sets the working directory for any subsequent instructions within the Docker image.For Nginx, the default location to serve static web content (like our
index.html) is/usr/share/nginx/html. By setting this as our working directory, we make it easier toCOPYour files to the correct place.
COPY index.html .:With the
COPYinstruction, we're taking ourindex.htmlfile from your local project directory and copying it into the currently setWORKDIR(/usr/share/nginx/html) inside the Docker image.The
.(dot) at the end signifies the currentWORKDIR.
EXPOSE 80:The
EXPOSEInstruction serves as documentation. It tells Docker (and anyone looking at the Dockerfile) that the application inside this container intends to listen on port 80 for incoming connections.This is the standard port for HTTP traffic. While
EXPOSEdoesn't actually publish the port to your host machine; it's an important declaration for understanding the container's network behaviour.
STEP 3: Building Your Docker Image
With your Dockerfile and index.html in place, it's time to transform those instructions into an actual Docker image! This is where the docker build command comes in.
Navigate to the directory where your Dockerfile and index.html are located in your terminal. Then, execute the following command:
docker build -t <your-docker-username>/simple-hello-world:latest .
Let's break down this command:
docker build: This is the core command that tells Docker to read yourDockerfileand create an image.-t(or--tag): This flag allows you to tag your new image. A tag gives your image a human-readable name and an optional version. It's good practice to follow the format<your-docker-username>/<app-name>:<version>.- Example: If your Docker Hub username is
prabakaran32your tag would beprabakaran32/simple-hello-world:latest. We'll explore Docker Registries and usernames in more detail later, but for now, just use your own Docker Hub username (or create a unique one if you don't have one).
- Example: If your Docker Hub username is
.(dot): This crucial dot at the end specifies the build context. It tells Docker where to find theDockerfileand any files it needs toCOPY(like ourindex.html). The.means "the current directory."# Now, You will see an terminal similer like this, [+] Building 8.8s (9/9) FINISHED docker:default => [internal] load build definition from Dockerfile 0.0s => => transferring dockerfile: 540B 0.0s => [internal] load metadata for docker.io/library/nginx:alpine 8.5s => [auth] library/nginx:pull token for registry-1.docker.io 0.0s => [internal] load .dockerignore 0.0s => => transferring context: 2B 0.0s => [1/3] FROM docker.io/library/nginx:alpine@sha256:65645c7bb6a0661892a8b03b89d0743208a18dd2f3f17a54ef4b76fb8e2f2a10 0.0s => [internal] load build context 0.0s => => transferring context: 32B 0.0s => CACHED [2/3] WORKDIR /usr/share/nginx/html 0.0s => [3/3] COPY index.html . 0.1s => exporting to image 0.0s => => exporting layers 0.0s => => writing image sha256:64c4ba82ff4065720121eff6320a4c2895336cdd1fa13dc0d2516be4140332f4 0.0s => => naming to docker.io/prabakaran32/simple-hello-world:latest
What Happens Next?
After you hit Enter, you'll see Docker spring into action in your terminal. You'll notice each instruction from your Dockerfile (FROM, WORKDIR, COPY, EXPOSE) being executed sequentially. Docker creates a new "layer" for each successful instruction, optimising for efficiency.
Verify Your Image:
Once the build process completes (it should be quite fast for this simple example), you can verify that your image was created successfully by listing all Docker images on your system:
docker images
#in my case it will shown as
REPOSITORY                        TAG            IMAGE ID       CREATED         SIZE
prabakaran32/simple-hello-world   latest         03d0bd5cd794   4 minutes ago   48.2MB
You should see an entry for prabakaran32/simple-hello-world (or whatever tag you used) with the latest version listed among your local images.
STEP 4: Running Your Docker Container
You've built the image; now let's bring it to life as a container! This is done using the docker run command. Since our web application needs to be accessible from your web browser, we'll also need to map the container's port to a port on your host machine.
Open your terminal and run the following command from any directory (you don't need to be in the project folder anymore, as the image is built):
docker run -d -p 3000:80 prabakaran32/simple-hello-world:latest
Let's break down this command:
docker run: This command instructs Docker to create and start a new container from a specified image.-d(or--detach): This flag runs the container in detached mode (in the background). This means your terminal won't be blocked, and you can continue to use it. Without-d, the container's output would stream directly to your terminal.-p <host-port>:<container-port>(or--publish): This is the crucial port mapping instruction.3000(host-port): This is the port on your local machine (your computer) that you'll use to access the web application. You can choose any available port here (e.g.,80,8080,5000, etc.).80(container-port): This is the port inside the Docker container where our Nginx web server is listening. Remember we usedEXPOSE 80in ourDockerfile? This is where that declaration becomes vital, as it tells us which container port to map to.
prabakaran32/simple-hello-world:latest: This is the name and tag of the Docker image you built in the previous step.
Verify the Container is Running:
To confirm that your container is up and running, open a new terminal window (if you ran in detached mode) and use the docker ps command:
docker ps
#in my case it will shown as
CONTAINER ID   IMAGE                                    COMMAND                  CREATED         STATUS         PORTS                                     NAMES
60e28c12a1c6   prabakaran32/simple-hello-world:latest   "/docker-entrypoint.…"   2 seconds ago   Up 2 seconds   0.0.0.0:3000->80/tcp, [::]:3000->80/tcp   wonderful_pare
You should see an entry for your simple-hello-world container, indicating its ID, image, command, creation time, status (Up for a few seconds/minutes), and the port mapping (0.0.0.0:3000->80/tcp).
View Your Web App!
Finally, open your web browser and navigate to:
You should now see your simple web page proudly displaying:
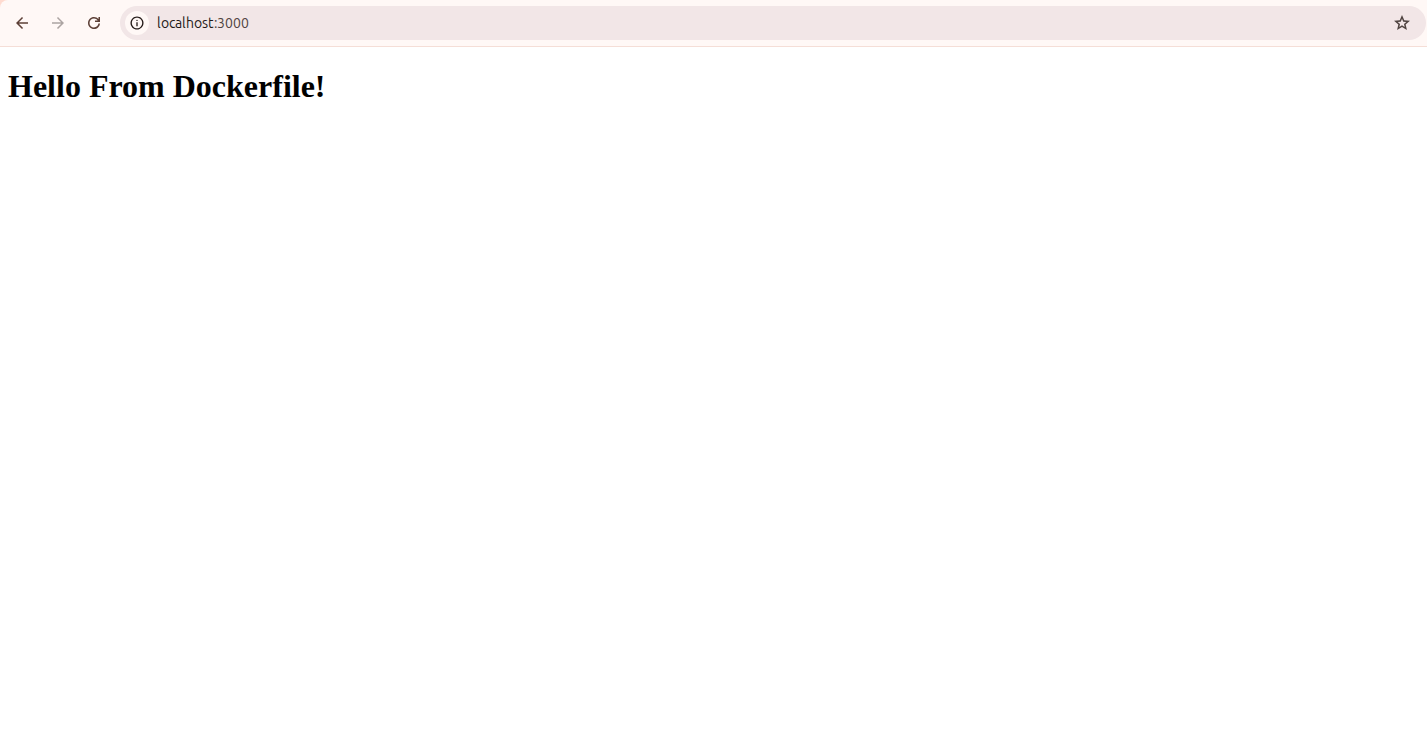
Congratulations! You've successfully built, run, and accessed your first Dockerized web application. This demonstrates the complete workflow from defining your environment in a Dockerfile to serving your application from a container.
STEP 6: Understanding Detached Mode (-d) for Your Web Container
In Step 4, we used the command docker run -d -p 3000:80 prabakaran32/simple-hello-world:latest. The key element here was the -d flag, which stands for detached mode.
What does "Detached Mode" mean for your container?
When you run a container in detached mode, Docker starts the container in the background and immediately frees up your terminal.
Non-Blocking Terminal: Unlike running a command directly in your terminal, the container's output (like server logs) is not streamed to your current shell. This allows you to continue using your terminal for other tasks, such as running more Docker commands, editing files, or Browse directories.
Ideal for Services: Detached mode is the standard way to run services like web servers (our Nginx container), databases, or API applications. These applications are designed to run continuously in the background without needing constant interaction.
No
docker runoutput: When you executedocker run -d, you'll typically see only the container ID printed to your terminal, confirming that the container has been started in the background.
What if you didn't use -d?
If you were to run docker run -p 3000:80 prabakaran32/simple-hello-world:latest (without -d), your terminal would be attached to the container's standard output. You would then see the Nginx web server's logs directly in your terminal. This is useful for debugging or when you want to see the real-time activity of your container, but it means your terminal is occupied. You would need to press Ctrl+C to stop the container (which also stops the process inside).
Managing Detached Containers
Since your container is running in the background, how do you interact with it or see its output?
Checking if it's running: Use
docker psto list all currently running containers. You should see yoursimple-hello-worldcontainer there.Viewing container logs: To see the Nginx web server's logs (just like if you hadn't used
-d), you can usedocker logsfollowed by your container's ID or name. First, get the container ID fromdocker ps:docker ps # Copy the CONTAINER ID, e.g., 'a1b2c3d4e5f6' docker logs <CONTAINER_ID>Stopping a detached container: When you're done with your web app, you can stop the running container using its ID or name:
docker stop <CONTAINER_ID>After stopping,
docker pswill no longer show it, butdocker ps -a(Show all containers, running or stopped) will.Removing a stopped container: Stopped containers still consume disk space. To remove it completely:
docker rm <CONTAINER_ID>
By understanding detached mode, you gain full control over how your background services run in Docker, from starting them efficiently to inspecting their logs and eventually stopping them.
Docker Registries: The Central Hub for Your Images
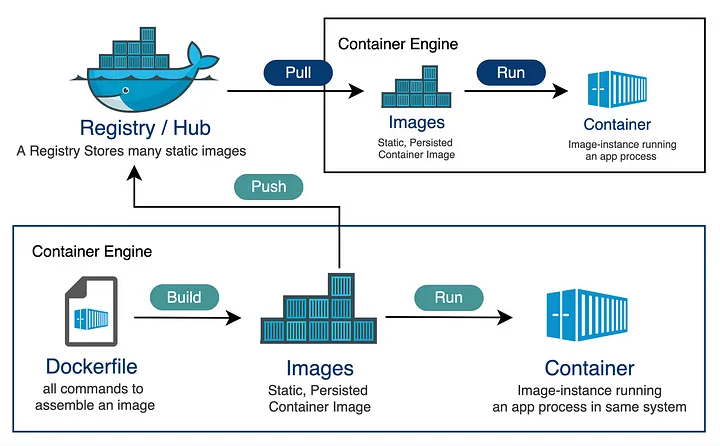
You've successfully built a Docker image locally. But what if you want to share this image with teammates, deploy it to a cloud server, or simply ensure you have a backup of it? This is where Docker Registries come into play.
What is a Docker Registry?
A Docker Registry is essentially a centralized storage and distribution system for Docker images. Think of it as a vast library or a version control system specifically designed for your container images.
Storage: It provides a secure place to store your built Docker images.
Distribution: It allows users to easily pull (download) images to their local machines or servers, and for developers to push (upload) new images.
Version Control: Images are typically stored with tags (like
:latestor:v1.0), which helps manage different versions of the same application.Collaboration: Teams can use a registry to share images seamlessly, ensuring everyone is working with the same approved versions.
Types of Docker Registries
There are primarily two types of Docker Registries you'll encounter:
Public Registries:
Description: These registries are open to everyone. Anyone can typically pull images from them. While you can often store public images for free, pushing private images usually requires a paid account.
Example: The most well-known public registry is Docker Hub (hub.docker.com). This is the default registry that your Docker client connects to when you use
docker pullordocker pushcommands without specifying a different registry. It hosts millions of images, including official images from various software vendors (likenginx,ubuntu,node) and community-contributed images.
Private Registries:
Description: These registries are restricted to specific users or organizations and require authentication to push or pull images. They are crucial for storing proprietary applications, sensitive data, or for companies that need tight control over their image distribution.
Examples:
Cloud Provider Registries: Major cloud providers offer their own managed private registries, often integrated with their other services. Examples include:
Amazon Elastic Container Registry (ECR)
Google Container Registry (GCR) / Artifact Registry
Azure Container Registry (ACR)
Self-Hosted Registries: You can also run your own private registry on your infrastructure using the open-source Docker Registry software. This provides complete control over data sovereignty and access, though it requires more operational overhead.
Essential Commands: docker push and docker pull
Now that you understand what a registry is, let's look at how you interact with it using two fundamental Docker commands:
1. docker push: Uploading Your Image to a Registry
The docker push command is used to upload your local Docker image to a registry. This makes your image accessible to others or to your deployment pipelines.
Before you can push an image to Docker Hub (or any private registry), you usually need to:
Log in: Authenticate your Docker client with the registry.
docker login(You'll be prompted for your Docker Hub username and password.)
Ensure correct tag: Your image must be tagged with the registry hostname (if not Docker Hub), your username/organization, and the image name/version. You already did this in Step 3 when you tagged your image as
prabakaran32/simple-hello-world:latest.
Using our example:
To push the simple-hello-world image you just built to your Docker Hub account:
docker push prabakaran32/simple-hello-world:latest
This command will upload all the layers of your image to your prabakaran32/simple-hello-world repository on Docker Hub. Once pushed, you can log into Docker Hub in your web browser and see your image listed under your repositories!
2. docker pull: Downloading Images from a Registry
The docker pull command is used to download a Docker image from a registry to your local machine. This is how you get base images, official images, or images shared by others.
Using our example:
Let's say you want to download an image someone else (or even you, from a different machine) pushed to Docker Hub. If you didn't have prabakaran32/simple-hello-world:latest locally, you would download it like this:
docker pull prabakaran32/simple-hello-world:latest
Docker will check your local image cache, and if it doesn't find the image (or the specified tag), it will download all the necessary layers from Docker Hub.
Conclusion: Embracing the Power of Docker
You've embarked on a journey through the world of Docker, from understanding its core definition and architecture to building and running your very first containerised web application.
We've explored how Docker revolutionises application development and deployment by providing:
Consistent Environments: Eliminating the "works on my machine" problem by packaging everything an application needs.
Unmatched Portability: Allowing your applications to run seamlessly across any environment, from your laptop to the cloud.
Resource Efficiency: Leveraging shared OS kernels for lightweight and fast-starting containers.
Scalability: Paving the way for modern microservices architectures.
Streamlined Workflows: Accelerating CI/CD pipelines and simplifying version control for your entire application stack.
You've seen firsthand how Dockerfiles act as blueprints for Images, which are then brought to life as isolated Containers. You've also learned essential commands like docker build, docker run, docker ps, and how Docker Registries like Docker Hub serve as crucial hubs for sharing and distributing your containerised applications using docker push and docker pull.
Docker has become an indispensable tool in the modern tech landscape. By embracing its principles and mastering these fundamental concepts, you're now equipped to build, ship, and run your applications with unprecedented efficiency, consistency, and confidence. Keep experimenting, keep building, and continue to explore the vast capabilities that Docker offers!